
Here are the questions that you might get in an interview about Laravel. The questions are divided into sections, so you can jump to any specific section if you want to.
General
Laravel is an open source framework for web application in PHP. It follows the MVC (Model-View-Controller) architectural pattern.
Artisan is a command-line interface(CLI) that comes with Laravel, to help us with development and other tasks, like- generating files, migrations, managing queues, and much more.
Artisan is powerd by Symfony Console.
Developers can extend its functionality by defining/creating custom commands.
Before creating Laravel project, make sure that PHP and Composer are installed on the machine.
Use the following command to install the Laravel installer globally, on the machine-composer global require laravel/installer
Now check if laravel installer works or not-laravel -V
If this does not work, then we don’t have the composer binaries added in the path.
Check composer path and bin directory path using following commands-composer global config home
composer global config bin-dir --absolute
Add to system path using the following command-export PATH="$HOME/.config/composer/vendor/bin:$PATH"
Then, load the changes from base-source ~/.bashrc
Now try “laravel -V“, it should work.
Create a new project using-laravel new your-project-name
Then you can choose your installation from the starter kits-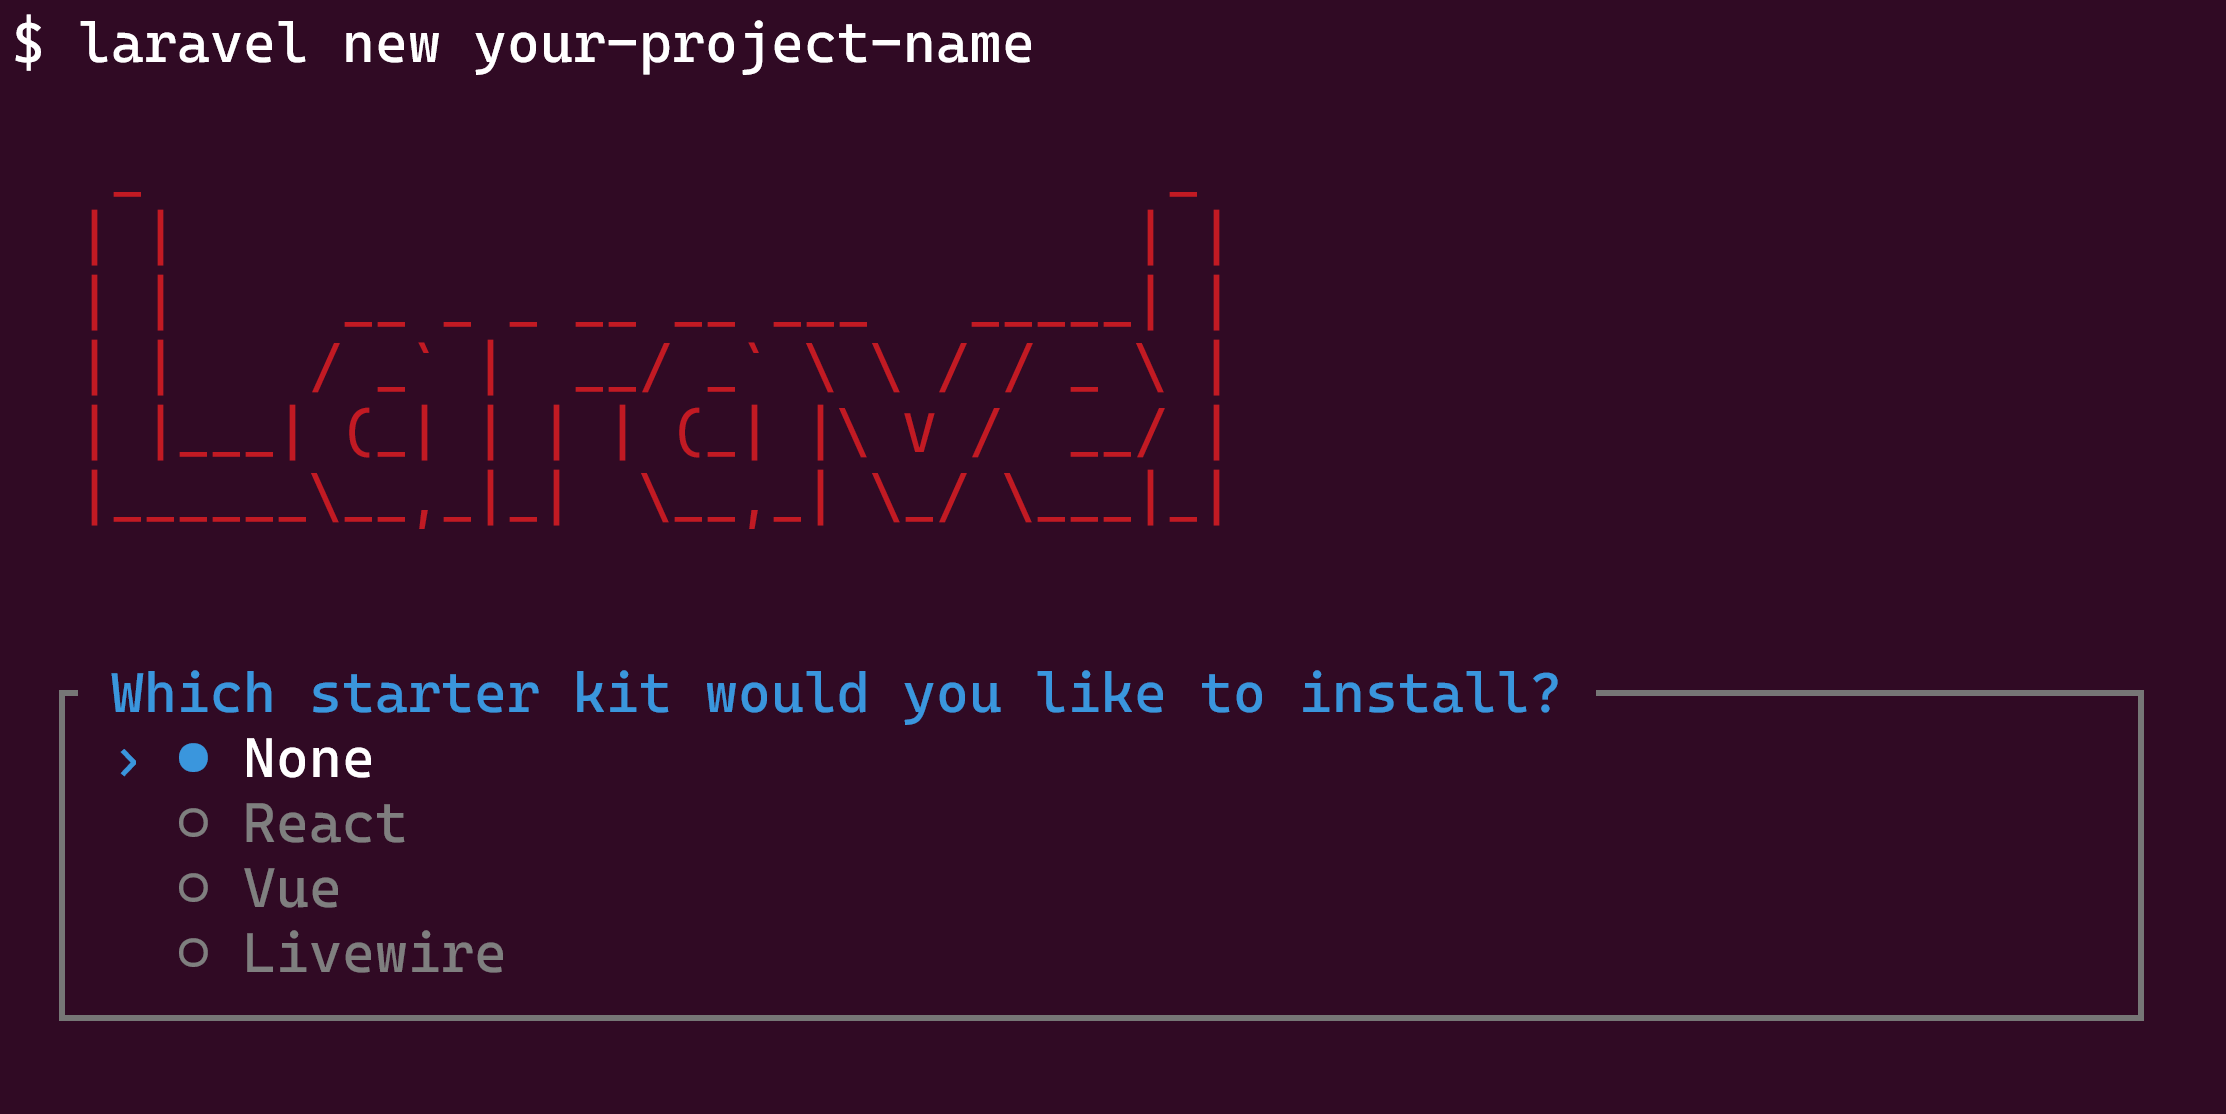
After the installation, the first step would be to run npm installation-npm install & npm run build
Then we can run the project using any of the following commands-php artisan serve
or,composer run dev
Directory & Files
Environment variables are saved in .env file. Variables are saved in the key=value format like below-APP_NAME=BigBoxCode
DB_CONNECTION=mysql
DB_HOST=127.0.0.1
DB_PORT=3306
DB_DATABASE=bbcode
DB_USERNAME=root
DB_PASSWORD=root*secret
We can retrieve these values directly using env("KEY_NAME_HERE") function.
But it is better not to use the env() function directly in the code, as the configuration caching in production can cause issue. It is better to use the env() in config file and use the value from config in your code using config() function.
Read this article for more details of the issue and best practice ⇛ Laravel: env() getting null value when used with config:cache
Use the following command to cache the configuration(in production):php artisan config:cache
Clear config cache using:php artisan config:clear
For production environment we need to make sure that the following 2 values are changed-APP_ENV=production
APP_DEBUG=false
Check current environment using command-php artisan env
Check config value using following command-php artisan config:show app.name
Lastly, the automated testing command( php artisan test ) will automatically use the values from file .env.testing , and if the value is not present in .env.testing then it will fall back to .env file.
The config directory is used to manage configuration setting in an application.
It contains files for the setting values for different parts of the application, such as general app values, datbase, email, caching, file system, queue, etc.
Each config file returns an array, where the values can be obtained from .env, or some other setting can be set. Here is an example-<?php
// config/app.php
return [
'name' => env('APP_NAME', 'Laravel'),
'env' => env('APP_ENV', 'production'),
'debug' => (bool) env('APP_DEBUG', false),
'url' => env('APP_URL', 'http://localhost'),
'timezone' => 'UTC',
'locale' => env('APP_LOCALE', 'en'),
// Other settings here
];
We can get the values in any part of our code by using the config() function.
Pass the file name and setting name, separated by dot(.), like below-$appName = config("app.name");
$databaseName = config("database.connections.mysql.database");
We can pass a default value to config(), as fallback/default value-$appName = config("app.name", "SomeDefaultAppName");
$databaseName = config("database.connections.mysql.database", "default_db");
Here are the key points of the “bootstrap” directory-
⇾ This directory includes “bootstrap/app.php” file, which is used to initialize the app and load essential services before handling requests.
⇾ Contains “bootstrap/providers.php” file to list of service providers that are required for running the application.
⇾ Contains “cache” directory for optimized configuration packages, services and route caching, to improve performance.
app/Providers/AppServiceProvider.php file in Laravel is the default service provider that is loaded when the application starts.
Its primary purpose is to bootstrap the application by registering services, bindings, and performing any setup that is required at the beginning of the application’s lifecycle.
The AppServiceProvider class extends the ServiceProvider class, and contains 2 methods-
⇾ register() : used to register services to service container. This is where we bind classes, interfaces, or services to the container, to make it available for dependency injection.
⇾ boot(): contains tasks that need to happen after all services are registered, for example, event listeners, model bind, view composers.
Blade templating engine helps to build the “view” layer of MVC in Laravel. Here are the key points of blade-
⇾ Makes it really easy to build the UI layer.
⇾ Organize the view by combining other blade files or components using directives @extends, @section, @yeild, @include, @component, etc.
⇾ Provides directives for conditional and loops, like @if, @else, @for, @foreach, etc.
⇾ Provides a way to print variables passed from controllers, ie. {{ $myVar }}.
Controllers
![]() NOTES
NOTES
Controller-related interview questions are divided into 3 videos. Here are the next 2 videos after watching the above.
A controller is a PHP class responsible for handling requests, processing business logic, and returning responses—usually by rendering a view or returning JSON for APIs.
Controllers act as central coordinators for a specific part of the application.
Controllers are stored in the app/Http/Controllers directory.
Here are the key responsibilities of a Controller-
⇾ Receive Input – handle incoming HTTP requests (GET, POST, etc.), and user input.
⇾ Process Data – process data by calling services and/or using models and/or performing custom logic.
⇾ Return Response – return a view, JSON, redirect, or any response object.
Here are different types of controllers in laravel-
⇾ Basic Controller – plain class with multiple methods.
⇾ Resource Controller – predefined methods mapped to REST routes. Created using: php artisan make:controller UserController –resource
⇾ API Resource Controller – used for APIs, that return JSON. An optional –api flag skips methods like create and edit.
⇾ Single Action Controller (Invokable) – Uses __invoke() method for one-action logic. Created using: php artisan make:controller ReportController –invokable
Create a controller using the following command:php artisan make:controller YourControllerName
For example, if we want to create controller for Customers, we name our controller CustomerController. So, use the following command:php artisan make:controller CustomerController
Create a resource controller which contains method for CRUD operations – index, create, store, edit, update, destroy, by using --resource flag:php artisan make:controller CustomreController --resource
Use the --api flag to create API controllers:php artisan make:controller CustomerController --api
After creating the controller, we need to create the methods to the route file(routes/web.php or routes/api.php), to specify which method is responsible for handling which URL endpoint.
php artisan make:controller and php artisan make:controller --resource? ⇾ php artisan make:controller CustomerController
This command creates an empty controller. Then we have to create the methods(like, index(), store(), update(), etc.).
⇾ php artisan make:controller CustomerController --resource
This commad will create the controller and common restful actions. Here are the methods and the purpose for which they are generally used-
index() – display list of items.
create() – show creat form.
store() – create new record using provided data.
show() – display a single resource/item.
edit() – show edit form.
update() – update the data of a specific item/resource.
destroy() – remove/delete item/resource from storage.
⇾ Using with() method –
Use with() method, this is a simple and readable way-public function index()
{
$customers = Customer::all();
return view('customer.index')->with('customers', $customers);
}
In the blade file resources/views/customer/index.blade.php use it, like below-@foreach ($customers as $customer)
<p>{{ $customer->name }}</p>
@endforeach
⇾ Using compact()–
Use the compact helper function, this is very common and concise:public function index()
{
$customers = Customer::all();
return view('customer.index', compact('customers'));
}
The compact() part is equivalent to-[
'customers' => $customers
]
⇾ Passing an associative array –
More explicit, especially when passing multiple variables:public function index()
{
$customers = Customer::all();
$title = "Customer List";
return view('customer.index', [
'customers' => $customers,
'title' => $title
]);
}
Use View::share() method to share data to all views, rendering in that request-View::share('pageTitle', 'Customer List');
Then we can use the variable $pageTitle to all the views-<h2>{{ $pageTitle }}</h2>
In Laravel, we can inject dependencies into a controller using constructor injection, or method injection. The service container of Laravel will automatically resolve the dependencies.
⇾ Constructor Injection(automatic) –
We can inject a class in the constructor of the controller and laravel will resolve that by instantiating in the service container.class CustomerController extends Controller
{
protected $customerService;
public function __construct(CustomerService $customerService)
{
$this->customerService = $customerService;
}
public function index()
{
$customers = $this->customerService->getAll();
return view('customer.index', compact('customers'));
}
}
Here, an instance of the CustomerService class will be created by the service container, and injected to the CustomerController.
⇾ Method Injection (automatic) –
We can inject directly to a controller method like below.class CustomerController extends Controller
{
public function index(CustomerService $customerService)
{
$customers = $customerService->getAll();
return view('customer.index', compact('customers'));
}
}
Here, an instance of the CustomerService will be created and injected to the index() method of the controller.
The same thing happens for the built-in objects. Like the Request object is injected automatically-public function store(Request $request)
{
}
⇾ Interface Binding–
If we are injecting an interface type, then we need to define the class, to which the interface should resolve to.public function __construct(CustomerServiceInterface $customerService)
{
$this->customerService = $customerService;
}
Here the laravel service provider does not know which class instance should be created for CustomerServiceInterface. So we have explecitely tell Laravel, by binding the interface to a class.
Do it in the ApServiceProvider, or any oterh provider(according to your project structure). Just add the following line for binding-$this->app->bind(CustomerServiceInterface::class, CustomerService::class);
Here, we are saying, if you need to inject an object of type CustomerServiceInterface, then create an instance of CustomerService class and inject that.
Say, you have to allow access to some controller to the admin user only, then create the middleware using command-php artisan make:middleware IsAdmin
Add the checking to the middleware-class IsAdmin
{
public function handle(Request $request, Closure $next): Response
{
if (auth()->check() && auth()->user()->is_admin) {
return $next($request);
}
abort(403, 'Unauthorized');
}
}
Then apply the middleware to the controller, using following code in your route configuration-Route::get('/admin', [AdminController::class, 'index'])->middleware('admin');
Or, apply the middleware to a group of controllers using following code-Route::middleware(['admin'])->group(function () {
Route::get('/dashboard', [DashboardController::class, 'index']);
});
⇾ Use response()->json(), and pass an array. That will return a JSON response-public function getCustomer()
{
return response()->json([
'success' => true,
'data' => [
'name' => 'BigBoxCode',
'email' => 'customer1@bigboxcode.com',
]
]);
}
⇾ Pass a collection to the response()->json() and that will return a JSON response-public function getCustomer()
{
$customers = Customer::all();
return response()->json($customers);
}
⇾ Or, just return an array and laravel will convert the response to JSON, if the request expectes JSON. The response is converted automatically-public function getCustomer()
{
return [
'success' => true,
'message' => 'User data returned successfully.',
];
}
Define the routes like below, the route file (in web.php or api.php file). Here, we are showing the different methods for CustomerController.Route::get('/customers', [CustomerController::class, 'index']);
Route::post('/customers', [CustomerController::class, 'store']);
Route::get('/customers/{id}', [CustomerController::class, 'show']);
Route::put('/customers/{id}', [CustomerController::class, 'update']);
Route::delete('/customers/{id}', [CustomerController::class, 'destroy']);
And define the relevant methods in the controller-class CustomerController extends Controller
{
public function index()
{
// Implementation of GET /customers
}
public function store(Request $request)
{
// Implementation of POST /customers
}
public function show($id)
{
// Implementation of GET /customers/{id}
}
public function update(Request $request, $id)
{
// Implementation of PUT /customers/{id}
}
public function destroy($id)
{
// Implementation of DELETE /customers/{id}
}
}
Define the API routes like below in routes/api.php –Route::get('/customers', [CustomerController::class, 'index']);
Route::post('/customers', [CustomerController::class, 'store']);
We can add prefix, using the prefix() function-Route::prefix('v1')->middleware('auth:api')->group(function () {
Route::get('/customers', [CustomerController::class, 'index']);
Route::post('/customers', [CustomerController::class, 'store']);
});
We can also create a separate file, say, for the v1 APIs. Let’s name it routes/api_v1.php. And then we can add that file –Route::prefix('api/v1')
->middleware('api')
->group(base_path('routes/api_v1.php'));
An invokable controller is a controller class with a single __invoke() method. This makes the controller behave like a callable class.
Then, it can be used to handle a route without specifying a method.
Create an invokable controller using the following command-php artisan make:controller SendNotificationController --invokable
Then the controller will have only one method to handle any HTTP request, named __invoke() –class SendNotificationController extends Controller
{
public function __invoke(Request $request)
{
}
}
And we can define the route as below-Route::post('/send-notification', SendNotificationController::class);
Use an invokable controller, when-
⇾ Your controller needs to perform only one action.
⇾ You want cleaner and more readable code.
⇾ You want to organize single-purpose logic without cluttering other controllers.
In general, we use it in cases, like-
⇾ Webhook receiver.
⇾ Notification sender.
⇾ Single-page view loader.
⇾ Background job trigger.
⇾ File uploader.
⇾ Daily report generatory.
A Singleton resource controller is a controller class that is resolved only once per request.
⇾ The service container resolves the controller only once per request.
⇾ A single instance of the controller is shared across the application in each request life cycle.
Create singleton controller using following command-php artisan make:controller ProfileController --singleton
Use Singleton controller when you need to share dependencies across multiple methods, and maintain state in a single request life cycle.
Define a singleton resource route using the Route::singleton(), without using the custom action methods, like below-Route::singleton('profile', ProfileController::class);
This defines the following-
If you only want the endpoint to destroy, but the endpoint for creating, then use destroyable() method while defining the route-Route::singleton('profile', ProfileController::class)->destroyable();
This defines the following-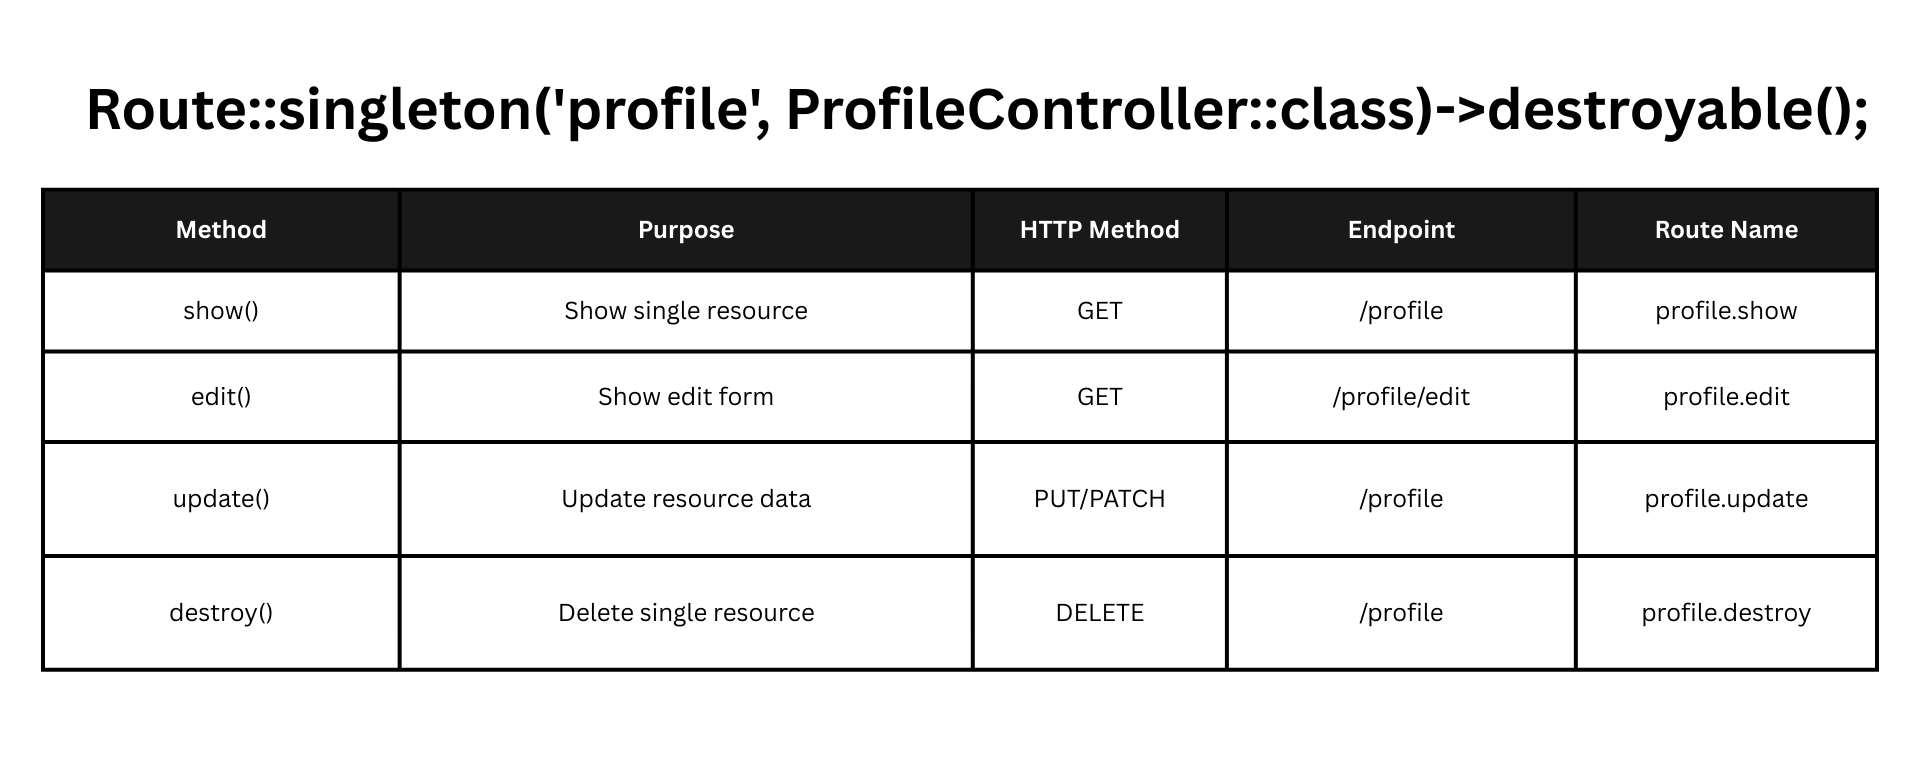
If you want the endpoints for creating resource, use creatable() method whie defining the route-Route::singleton('profile', ProfileController::class)->creatable();
This defines the following-
For the API route Route::apiSingleton(), like below-Route::apiSingleton('profile', ProfileController::class);
orRoute::apiSingleton('profile', ProfileController::class)->destroyable();
orRoute::apiSingleton('profile', ProfileController::class)->creatable();
Laravel uses mainly 2 things to resolve controller dependencies-
⇾ Reflection – inspect the class(es), and then decide how to resolve the dependencies.
⇾ Service container – manage how objects are created, and handle complex object graph(dependencies of dependencies).
Here is how the dependencies are resolved-
⇾ Type-hinted parameters are resolved from the container.
⇾ If not bound, then Laravel tries to instantiate them directly.
⇾ Nested dependencies are resolved recursively.
⇾ Dependency resolution behavior can be customized by using service binding.
Create a test class using the following command-php artisan make:test CustomerControllerTest
Then write the tests-class CustomerControllerTest extends TestCase
{
use RefreshDatabase;
public function test_can_get_user_list()
{
Customer::factory()->count(5)->create();
$response = $this->get('/customers');
$response->assertStatus(200);
$response->assertJsonCount(5, 'data');
}
public function test_store_requires_title()
{
$response = $this->post('/customers', []);
$response->assertSessionHasErrors('title');
}
}
If you are using Pest, then write the test like below-it('can get customer list', function () {
Customer::factory()->count(5)->create();
$response = $this->get('/customers');
$response->assertOk();
$response->assertJsonCount(5, 'data');
});
it('requires title when storing a customer', function () {
$response = $this->post('/customers', []);
$response->assertSessionHasErrors('title');
});
Create a trait normally and use it in the controller(s). Here we are creating trait ActionLogger-trait ActionLogger
{
public function logAction($message)
{
Log::info($message);
}
}
Now we can use the trait-class ProductController extends Controller
{
use ActionLogger;
public function store(Request $request)
{
// store product logic here...
$this->logAction('A new product was created.');
}
}
class OrderController extends Controller
{
use ActionLogger;
public function cancel($id)
{
// cancel order logic here...
$this->logAction("Order #{$id} was canceled.");
}
}
Requests and Validation
Accept the data form the Reqeust object. We can get all the submitted data by using $request->all(), and use it like below-class CustomerController extends Controller
{
public function store(Request $request)
{
$data = $request->all();
$customer = Customer::create($data);
return redirect()->route('customer.store')->with('success', 'Customer created!');
}
}
We can accept only certain specific fields from input use $request->only() –class CustomerController extends Controller
{
public function store(Request $request)
{
$data = $request->only([
'name',
'email',
'phone',
]);
$customer = Customer::create($data);
return redirect()->route('customer.store')->with('success', 'Customer created!');
}
}
Simply we can add an inline validation to the controller, by using the $request->validate() and add validation rule to it-class CustomerController extends Controller
{
public function store(Request $request)
{
$validatedData = $request->validate([
'name' => 'required|string|max:255',
'email' => 'required|email|unique:customers,email',
'phone' => 'nullable|string|max:20',
]);
$customer = Customer::create($validatedData);
return redirect()->route('customer.store')->with('success', 'Customer created!');
}
}
Create a request class using the artisan command make:reqeust –php artisan make:request StoreCustomerRequest
This creates file- app/Http/Requests/StoreCustomerRequest.php
Add the validation rules to the file-class StoreCustomerRequest extends FormRequest
{
public function authorize()
{
return true; // Apply the authorization logic, and return boolean value
}
public function rules()
{
return [
'name' => 'required|string|max:255',
'email' => 'required|email|unique:customers,email',
'phone' => 'nullable|string|max:20',
];
}
}
Then we can use the request in controller(s)-class CustomerController extends Controller
{
public function store(StoreCustomerRequest $request)
{
$data = $request->only(['name', 'email', 'phone']);
$customer = Customer::create($data);
return redirect()->route('customer.store')->with('success', 'Customer created!');
}
}
Where we create request class, it extends FormRequest–class StoreCustomerRequest extends FormRequest
{
public function authorize(): bool
{
return true;
}
public function rules(): array
{
return [
'first_name' => 'required|string|max:255',
'last_name' => 'required|string|max:255',
'email' => 'required|string|email|max:255|unique:customers,email',
'password' => 'required|min:6|confirmed',
];
}
}
Here is the benefit of using FormRequest based request class for validation-
⇾ Cleaner Controllers (Separation of Concerns): moves validation logic out of controllers, keeping them focused on business logic.
⇾ Reusable Validation Rules: we can reuse the same request class for multiple methods if they share the same validation.
⇾ Centralized Validation: keeps all the validation logic in one place (app/Http/Requests/), which is easier to debug and maintain.
⇾ Authorization Logic Included: we can define authorize() to control access to the action directly inside the request.
⇾ Custom Messages and Attributes: define custom error messages and field names easily in the request class.
⇾ Easier Testing: request classes can be unit tested independently from controllers.
⇾ Improved Readability: developers can glance at the request class to understand all validation requirements, rather than digging through controller logic.
So, use form requst when-
⇾ Your controller actions are getting cluttered.
⇾ You want to reuse validation rules.
⇾ You need authorization on a per-request basis.
⇾ You’re building APIs or large applications.
Create the form for file upload-<form action="{{ route('customer.upload') }}" method="POST" enctype="multipart/form-data">
@csrf
<input type="file" name="profile_image">
<button type="submit">Upload</button>
</form>
Here is the controller method that handles the customer profile image upload-class CustomerController extends Controller
{
public function upload(Request $request)
{
$request->validate([
'profile_image' => 'required|image|mimes:jpg,jpeg,png|max:2048',
]);
if ($request->hasFile('profile_image')) {
$file = $request->file('profile_image');
$filename = time() . '_' . $file->getClientOriginalName();
$path = $file->storeAs('uploads', $filename, 'public');
return back()->with('success', 'File uploaded successfully!');
}
return back()->with('error', 'No file selected.');
}
}
No.
Because-
⇾ Laravel resolves FormRequest instances, before the service container is available to handle dependency injection.
⇾ Simple new instantiation of the class is used for FormRequest instances creation.
But we can use service, inside FormReqeust object, via-app(SomeService::class)
orApp::make(SomeService::class)
Routing
Use the files in routes/ directory to define route. Here is what file to choose for what purpose-
⇾ routes/web.php – for web routes, for browser based requests.
⇾ routes/api.php – for API routes, which by default has prefix /api.
⇾ routes/console.php – for artisan console commands.
⇾ routes/channels.php – for broadcasting channels.
Here is how we can define route simply in the route file-Route::get('/customers', function () {
$customers = Customer::all();
return response()->json($customers);
});
Here is how to define routes with controllers-Route::get('/customers', [CustomerController::class, 'index']);
Route::post('/customers', [CustomerController::class, 'store']);
Set the param in route inside curly braces. For example, if we want to pass “id” to the customer route-Route::get('/customers/{id}', [CustomerController::class, 'show']);
Add a question mark(?) to the parameter name to make it optional-Route::get('/customers/{id?}', [CustomerController::class, 'show']);
Use the name function to define name for a route definition-Route::get('/customer/{id}', [CustomerController::class, 'show'])->name('customer.profile');
Then we can use it to redirect to that route-return redirect()->route('customer.profile', ['id' => 1]);
To get the URL use the route() method-$url = route('customer.profile', ['id' => 1]);
Or link like this-<a href="{{ route('customer.profile', ['id' => 1]) }}">Profile</a>
Check if the current route matches this profile route-if (request()->routeIs('customer.profile')) {
// Do something
}
⇾ Use the prefix() function to set the prefix.
⇾ Use middleware() function to set middlewares.
⇾ Finally use the group function to group the routes.
Here is an example-Route::prefix('admin')->middleware(['auth'])->group(function () {
Route::get('/dashboard', [AdminController::class, 'dashboard']);
Route::get('/profile', [ProfileController::class, 'profile']);
Route::get('/settings', [SettingController::class, 'settings']);
});
A resource route automatically generates controller methods for CRUD operations-Route::resource('customers', CustomerController::class);
Here are the routes and controller methods, that a resource route generates-
⇾ GET /customers – index()
⇾ GET /customers/create – create()
⇾ GET /customers/{customer} – show()
⇾ POST /customers – store()
⇾ GET /customers/{customer}/edit – edit()
⇾ PUT/PATCH /customers/{customer} – update()
⇾ DELETE /customers/{id} – destroy()
Route model binding is the process where we can automatically inject model instance through route parameter, into our controller methods.
Define the following in route-Route::get('/customers/{customer}', [CustomerController::class, 'show']);
Define it in the controller-class CustomerController extends Controller
{
public function show(Customer $customer)
{
return view('customer.show', compact('customer'));
}
}
We call the URL-https://bigboxcode.com/customers/1
Here is how the binding works-
⇾ Automatic Binding: Laravel automatic binds a route param to a model, based on the model name. This will automatically resolve to Customer model instance, identified by the primary key(id).
⇾ Explicit Binding: We can explicitely define which binding should resolve to which model. Add this to any service provider, in your AppServiceProvider, or create a new service provider RouteServiceProvider–public function boot()
{
parent::boot();
Route::model('customer', \App\Models\CustomCustomer::class);
}
This binds the ‘customer‘ from the route to the model “CustomerCustomer“.
⇾ Custom Binding: We can define custom binding, say we want to fetch “Post” by “slug“, then we have to define the route as below-Route::get('/post/{slug}', [PostController::class, 'show']);
Then defien the custom binding in your AppServiceProvider, or your custom RouteServiceProvider–public function boot() {
parent::boot();
Route::bind('post', function ($slug) {
return Post::where('slug', $slug)->firstOrFail();
});
}
Middleware
Middleware stays between an incoming request and application response.
It is used to filter and/or modify and/or restrict access to a certain route before the request reaches the controller.
Here are common usage of Laravel middleware-
⇾ Authentication – check if user is loggedin or not.
⇾ Authorization – check if the user(or role) has permission to access the resource.
⇾ CSRF Protection – validate a Cross-Site Request Forgery attempt.
⇾ Logging – tract the user or request activity.
⇾ CORS Handling – managing Cross-Origin Resource Sharing.
⇾ Request Modification – modify incoming request before it reaches to the controller.
⇾ Response Modification – modify outgoing request after the controller finished processing, and response being sent to the user.
Generate a middleware using artisan command-php artisan make:middleware CheckUserRole
This will create a middleware file, and we can write our middleware logic inside the CheckUserRole.php –class CheckUserRole
{
public function handle(Request $request, Closure $next): Response
{
if (!$request->user() || $request->user()->role !== 'admin') {
return redirect('/home');
}
return $next($request);
}
}
If it is a global middleware then register it in bootstra/app.php file, inside withMiddleware() –withMiddleware(function (Middleware $middleware) {
$middleware->append(CheckUserRole::class);
})
For applying a middleware to a route, use the middleware() function-Route::get('/', function () {
// ...
})->middleware([CheckUserRole::class]);
⇾ Global Middleware: global middlewares are applicable to all request, and automatically run on every request to any route of the application.
⇾ Route Middleware: a route middleware only applies to the specific route.
We can pass the parameter while applying the middleware to route-
Route::get(‘/premium-content’, [ContentController::class, ‘premiumContent’])->middleware(‘subscription:premium,18’);
Then we can accept the values in the handle() method like below-public function handle(Request $request, Closure $next, $subscriptionType, $ageRequirement) {
$user = $request->user();
if (!$user || $user->subscription_type !== $subscriptionType || $user->age < $ageRequirement) {
return redirect('/home');
}
return $next($request);
}
⇾ Before Middleware: before middlewares are executed before the request reaches to the controller.class CheckIfAuthenticated
{
public function handle($request, Closure $next)
{
if (!auth()->check()) {
return redirect('/login');
}
return $next($request);
}
}
⇾ After Middleware: after middlewares are executed after the controller finish processing the request, and return the response.class AddCustomHeader
{
public function handle($request, Closure $next)
{
$response = $next($request);
$response->headers->set('X-Custom-Header', 'Big Box Head');
return $response;
}
}
Yes, we can run the code to be executed before and after a request in the same Laravel middleware. Here is how we should define the handle() function of the middleware for that-public function handle(Request $request, Closure $next): Response
{
// Before the request is handled by the controller
logger('Before middleware: ' . now());
$request->merge(['custom_data_before_processing' => "Big Box Code from before middleware"]);
$response = $next($request); // Call the next middleware / controller
// After the controller returns response
logger('After middleware: ' . now());
$response->headers->set('custom_data_after_processing', "Big Box Code from after middleware");
return $response;
}
Throttle middleware is a built-in middleware in Laravel, that is used to limit the number of requests by a client, in a certain time period.Route::get('/customers', [CustomerController::class, 'index'])->middleware('throttle:60,1');
This allows 60 requests to the /customers endpoint in 1 minute.
If the limit exceeds, then the user gets-
Response Status: 429
Message: { “message”: “Too many requests.” }
⏵ Every time a request comes, Laravel saves the request count in cache(whatever cache driver you have set).
⏵ We can define our custom throttle middlewire.
Set priority of middleware in the withMiddleware method in bootstrap/app.php –->withMiddleware(function (Middleware $middleware) {
$middleware->priority([
\App\Http\Middleware\CheckAuth::class,
\Illuminate\Auth\Middleware\CustomHeader::class,
]);
})
In this case the CheckAuth middleware will be executed first, then CustomHeader.
If we have multiple roles like, admin, manager, etc. and we want to give access to certain route to certain role-Route::get('/admin', [AdminController::class, 'index'])->middleware('role:admin');
Route::get('/shop', [ShopController::class, 'index'])->middleware('role:manager');
Route::get('/dashboard', [DashboardController::class, 'index'])->middleware('role:admin,manager');
Here is the definition of the handle() method of the middleware-public function handle(Request $request, Closure $next, …$roles) {
if (!Auth::check() || !in_array(Auth::user()->role, $roles)) {
abort(403, 'Unauthorized');
}
return $next($request);
}
A terminable middleware that has a terminate() method in it, and this terminate method is executed after the request is sent to user.
This type of middleware would have 2 methods-
⇾ handle() – which is executed before request is sent to the user.
⇾ terminate() – which is executed after the request is sent to the user.
These terminate() method is used to tasks like logging, background processing and/or cleanup, etc.
Here is an example-class SomeCustomMiddleware
{
public function handle(Request $request, Closure $next)
{
return $next($request);
}
public function terminate($request, $response)
{
Log::info('Response sent to user- ', ['url' => $request->fullUrl(), 'status' => $response->status(),]);
}
}
Database
Migration
Database migration in Laravel work as version control for changes in database schema. We can save the database schema changes in PHP code.
We can also apply the changes in a migrations and revert the changes with simple artisan commands.
Use artisan command make:migration to create a migration-php artisan make:migration create_customer_table
This will create a file in the database/migrations/ directory.
If needed, use -m flag to create migration, while creating the model.php artisan make:model Customer -m
The migration file has a class with 2 methods-
⇾ up() – for applying the changes in database, when we run the migration.
⇾ down() – for reverting the changes when we want to rollback(the changes done in the up method).
Here is a sample migration file-return new class extends Migration {
public function up(): void
{
Schema::create('customers', function (Blueprint $table) {
$table->id();
$table->string('name');
$table->string('email')->unique();
$table->timestamps();
});
}
public function down(): void
{
Schema::dropIfExists('customers');
}
};
Use the artisan command migrate to run the migration-php artisan migrate
This will execute the up() method of the migration(s). This will run all the pending migrations.
Laravel saves the information of which migrations are already executed in the migrations table in database.
To revert the changes done by a migration, use the artisan command migrate:rollback –php artisan migrate:rollback
This will run the down() method of the migration(s).
To rollback specific number of migrations use the –step flag-php artisan migrate:rollback --step=3
Use the migrate:refresh command to rerun all the migrations-php artisan migrate:refresh
This will drop all tables and re-run all the migrations.
To run seeder along with database migration refresh use the –seed flag-php artisan migrate:refresh --seed
The foreignId() function is used to establish the foreign key relationship in databases. This foreignId() is a shortcut to set id as foreign key-Schema::create('orders', function (Blueprint $table) {
$table->id();
$table->foreignId('customer_id')->constrained();
$table->timestamps();
});
This use of foreignId() is equivalent to –$table->foreign('customer_id')->references('id')->on('customers');
If there are lots of migration files, then we can split those in separate directories, like, user, customer, product, or any other logical groups.
the migrate command will run all migration from database/migrations and all it’s subdirectories.
If needed check the status of migration using migrate:status command-php artisan migrate:status
If you want to check what queries will run in the next migration, without running the migration, us the –pretend flag –php artisan migrate --pretend
Use the following command to create a schema file-php artisan schema:dump
This will create a schema file in database/schema directory. And, next time you run the migration, it will take the schema from that schema file(the migration files will be ignored in that case). Using this schema will reduce the migrations time, in case of large migration.
Seeder
Seeder is a class in Laravel, that is used to insert initial data or some dummy/test data into the database.
Use cases-
⇾ Initial data – add initial data set, like a user, admin user, customer, etc..
⇾ Dummy data – add dummy data for the development environment.
⇾ Config data – data set for configuration, like, country, city, customer type, order status, user role, permission, etc.
⇾ Test data – add date while running tests, to verify different operations.
Use artisan command make:seeder to create seeder-php artisan make:seeder CustomerSeeder
This creates a file database/seeders/CustomerSeeder.php. This file extends Seeder and implements a run() function-class CustomerSeeder extends Seeder
{
public function run()
{
// Creates a single record
Customer::create([
'name' => 'First User',
'email' => 'user1@bigboxcode.com',
]);
// Creates 10 random records
Customer::factory(10)->create();
}
}
This seeder is not executed by default, when we run the seeder command.
We need to register the seeder in the file database/seeders/DatabaseSeeder.php, in the run() method –public function run() {
$this->call([
CustomerSeeder::class,
ProductSeeder::class,
OrderSeeder::class,
]);
}
All these registered seeders will be executed, when we run the artisan command db:seed.
Run the seeders by using the artisan command db:seed:php artisan db:seed
We can run the seeders while running the migrations, use the –seed flag:php artisan migrate --seed
These commands will run all the seeders registered in database/seeders/DatabaseSeeder.php.
If we want to run a specific seeder then use –class flag like below-php artisan db:seed --class=CustomerSeeder
We can add condition like below-
⇾ Check count and add rows if there is no entry-public function run() {
if (Customer::count() == 0) {
Customer::factory(10)->create();
}
}
⇾ Use the firstOrCreate to add record with condition-public function run() {
Customer::firstOrCreate(
['email' => 'user1@bigboxcode.com'],
['name' => 'First User']
);
}
⇾ Check environment if environment is ‘local‘ or ‘testing‘ –public function run() {
if (App::environment('local', 'testing')) {
Customer::factory(10)->create();
}
}
⇾ Check if admin exist, and add new admin if there is none-public function run() {
if (!User::where('role', 'admin')->exists()) {
User::create([
'name' => 'Admin User',
'email' => 'admin@bigboxcode.com',
'role' => 'admin',
'password' => bcrypt('password'),
]);
}
}
Certain seeders need to run in production-
⇾ For adding configurations, like, user roles, country, city list, etc.
⇾ For adding default users, or some other values like this.
For everything else, we like dummy data, we should add a check for the environment, and add dummy data only for the development environment.
Factory
Factory is feature in Laravel that allows us to generated dummy/fake data for database tables.
Factory uses Faker library to generate random data, and these dummy data are useful for development, and/or testing.
Faker is used to insert dummy/fake/random data to database.
But, seeder is used to insert specific data to database. Sometimes we use factory inside seeder, with the intention to insert fake data.
Use artisan command make:factory to create a factory, also set the model for that factory by using –model flag-php artisan make:factory CustomerFactory --model=Customer
This will create a factory file database/factories/CustomerFactory.php, and we can define how the factory data will be generate-class CustomerFactory extends Factory
{
protected $model = Customer::class;
public function definition(): array
{
return [
'name' => $this->faker->name,
'email' => $this->faker->unique()->safeEmail,
'phone' => $this->faker->phoneNumber,
'address' => $this->faker->address,
];
}
}
To enable the factory support for the Customer model, make sure that it uses the HasFactory trait-class Customer extends Model
{
use HasFactory;
}
Then we can use the factory anywhere we want-Customer::factory()->count(10)->create();
Like in a seeder we can use-class CustomerSeeder extends Seeder
{
public function run()
{
Customer::factory(50)->create();
}
}
Say we have 2 models, Order and Customer. Make sure the relation is defined in the model.
Then define the factories like below-class CustomerFactory extends Factory
{
protected $model = Customer::class;
public function definition(): array
{
return [
'name' => $this->faker->name,
'email' => $this->faker->unique()->safeEmail,
];
}
}
Then in the order factory create customer along with the order-class OrderFactory extends Factory
{
protected $model = Order::class;
public function definition(): array
{
return [
'customer_id' => Customer::factory(),
'order_number' => $this->faker->uuid,
'total' => $this->faker->randomFloat(2, 10, 500),
];
}
}
Faker is a PHP library for generating fake data for testing and development. This package is used to generate random data, like, names, emails, address, phone number, etc.
Yes, we can use factory to just generate data and return it, without inserting it to database.
Define a factory-class CustomerFactory extends Factory
{
protected $model = Customer::class;
public function definition(): array
{
return [
'name' => $this->faker->name,
'email' => $this->faker->unique()->safeEmail,
];
}
}
Now use the make method to create data and return it-$customer = Customer::factory()->make();
dd($customer);
or-$customers = Customer::factory()->count(10)->make();
dd($customers);
Eloquent ORM
Eloquent is the ORM(Object-Relation Mapper) shipped with Laravel. It provides an easy way to interact with the database.
Here are the key features of eloquent-
⇾ Active Record Pattern– each model represents a table from the database.
⇾ Expressive API– it has very easy and expressive for querying and other database operations.
⇾ Relationships – supports many relationships like one-to-one, one-to-many, many-to-many, hasManyThrough, etc.
There are many more features that Eloquent supports.
A model is Laravel represents a table in Laravel. And each object of the model, represents a record/row from the table.
Use the command make:model to create a model-php artisan make:model Customer
This will create file app/models/Customer.php. This is how the model definition looks like-class Customer extends Model
{
use HasFactory;
protected $table = 'customers';
protected $fillable = ['name', 'email', 'phone'];
public $timestamps = true;
}
Use the all() function of the model-$customers = Customer::all();
get() is for getting all records-$customers = Customer::where('status', 'active')->get();
first() is for getting the first record record that matches the condition-$customer = Customer::where('status', 'active')->first();
find() is for getting single record based on primary key-$customer = Customer::find(10);
Use the create() method of the model-$customer = Customer::create([
'name' => 'John Doe',
'email' => 'john@example.com',
'status' => 'active',
]);
$customer = Customer::find(1);
$customer->update([
    'name' => 'Updated Name',
    'status' => 'active',
]);
Find the record and delete-$customer = Customer::find(1);
if ($customer) {
$customer->delete();
}
Use destroy() to delete by id-Customer::destroy(1);
or pass array of ids-Customer::destroy([2, 3, 4]);
Delete with where clause-Customer::where('status', 'inactive')->delete();
Without auto-cascade-$customer = Customer::find(1);
if ($customer) {
$customer->orders()->delete();
$customer->delete();
}
With auto-cascade, use the deleting event of database model, to auto delete related records-class Customer extends Model
{
protected static function boot()
{
parent::boot();
static::deleting(function ($customer) {
$customer->orders()->delete();
});
}
public function orders()
{
return $this->hasMany(Order::class);
}
}
Use the timestamps() method to add the timestamp-related column to a table-public function up(){
Schema::create('customers', function (Blueprint $table) {
$table->id();
$table->string('name');
$table->string('email')->unique();
$table->timestamps();
});
}
Using the $table->timestamps() will add columns “created_at” and “updated_at“. These columns are managed and updated by Laravel by default.
To disable the timestamp for a model, use $timestamps = false, in the model-class Customer extends Model
{
public $timestamps = false;
}
Soft delete allows you to delete a record without permanently removing it from the database. In this case, Laravel sets the “deleted_at” timestamp, which is used to determine if the record is deleted or not.
Add the soft delete option to the migration to add the deleted at column-public function up(){
Schema::table('customers', function (Blueprint $table) {
$table->softDeletes(); // Adds deleted_at column
});
}
Use the SoftDeletes trait on a model to enable soft delete.use Illuminate\Database\Eloquent\SoftDeletes;
class Customer extends Model
{
use SoftDeletes;
}
In any case if you want to get the deleted record, then use withTrashed() like below-Customer::withTrashed()->find(1);
Use the restore() method to restore a soft-deleted record-$model->restore();
To force delete from database, use forceDelete()-$model->forceDelete();
$fillable property is an allowlist (whitelist) that defines which attributes can be mass assigned.class Customer extends Model
{
protected $fillable = ['name', 'email', 'address'];
}
$guarded property is a blocklist (blacklist) that defines which attributes cannot be mass assigned-class Customer extends Model
{
protected $guarded = ['role'];
}
The “role” property will be ignored if provided in the model create.
Use the orderBy() method of the model; by default, it will sort by ascending order-$customers = Customer::orderBy('name')->get();
If you want to sort in descending order, then pass the second param ‘desc‘-$customers = Customer::orderBy('name', 'desc')->get();
We can also use multiple orderBy for columns-customers = Customer::orderBy('name', 'asc')->orderBy('zipcode', 'desc')->get();
We can paginate query results using any of the following-
⇾ paginate()
⇾ simplePaginate()
⇾ cursorPaginate()
These methods will automatically handle the offset and limit.
Use the paginate method like below-$customers = Customer::orderBy('name')->paginate(10);
Show the pagination links using the links method-@foreach ($customers as $customer)
{{ $customer->name }}
@endforeach
{{ $customers->links() }}
We can use the other pagination methods in the same way-$customers = Customer::orderBy('name')->simplePaginate(10);
or,$customers = Customer::orderBy('name')->cursorPaginate(10);
If there is some extra param needed to be added to the pagination URL, then use the append() method-$customers = Customer::where('status', 'active')->paginate(10)->appends(['search' => request('search')]);
Use methods from DB facade to run raw queries-
⇾ Select query:$customers = DB::select("SELECT * FROM customers");
⇾ Insert query:DB::insert("INSERT INTO customers (name, email, created_at, updated_at) VALUES (?, ?, NOW(), NOW())", ['BigBoxCode', 'customer1@bigboxcode.com']);
⇾ Update query:DB::update("UPDATE customers SET email = ? WHERE id = ?", ['newcustomer@bigboxcode.com', 1]);
⇾ Delete query:DB::delete("DELETE FROM customers WHERE id = ?", [1]);
⇾ DDL queries:DB::statement("CREATE TABLE customers (id INT AUTO_INCREMENT PRIMARY KEY, name VARCHAR(255))");
⇾ We can also use the DB::raw for certain parts of raw query-$orderRevenue = DB::table('orders')
->select(DB::raw('SUM(quantity * price) as total_revenue'))
->first();
Check the existence of data for a certain condition-$customerExists = Customer::where('email', 'customerone@bigboxcode.com')->exists();
This is equivalent to the SQL query-SELECT EXISTS(SELECT * FROM customers WHERE email = 'customerone@bigboxcode.com');
Get the count of records for a certain condition-$customerCount = Customer::where('status', 'active')->count();
This is equivalent to the query-SELECT COUNT(*) FROM customers WHERE status = 'active';
Get the value from request using $request->input():public function index(Request $request) {
$query = Customer::query();
if ($request->has('name')) {
$query->where('name', 'like', '%' . $request->input('name') . '%');
}
if ($request->has('status')) {
$query->where('status', $request->input('status'));
}
$customers = $query->get();
return response()->json($customers);
}
If you want to add validation for the param, then use the $reqeust->validate() method-public function index(Request $request) {
$validated = $request->validate([
'name' => 'nullable|string|max:255',
'status' => 'nullable|in:active,inactive,pending',
'sort_by' => 'nullable|in:name,created_at,status',
'order' => 'nullable|in:asc,desc',
'page' => 'nullable|integer|min:1',
]);
$query = Customer::query();
if (!empty($validated['name'])) {
$query->where('name', 'like', '%' . $validated['name'] . '%');
}
if (!empty($validated['status'])) {
$query->where('status', $validated['status']);
}
if (!empty($validated['sort_by'])) {
$query->orderBy($validated['sort_by'], $validated['order'] ?? 'desc');
}
return response()->json($query->paginate(10));
}
Using casting in the eloquent model allows us to automatically convert attributes to the specific type, while saving and retrieving. Use the $casts property in the model-class Customer extends Model
{
protected $casts = [
'is_active' => 'boolean', // Converts 0/1 to true/false
'joined_at' => 'datetime', // Parses as Carbon instance
'preferences' => 'array', // Converts JSON to an array
'settings' => 'json', // Converts JSON to an object
'total_spent' => 'decimal:2' // Ensures decimal precision
];
}
If the SP returns some result then use DB::select()-$customers = DB::select('CALL get_customers()');
Use the second parameter, to pass any argument-$status = 'active';
$customers = DB::select('CALL get_customers_by_status(?)', [$status]);
Use DB::statement() for SP that performs any action, and does not return any value in the end-$name = 'BigBoxCode';
$email = 'customerone@example.com';
DB::statement('CALL add_customer(?, ?)', [$name, $email]);
Mass assignment vulnerability happens when unguarded user input is allowed and makes unintended database modification.$user = User::create($reqeust->all());
Say, we have a ‘is_admin‘ column or ‘status’ column in the user table. and user ends that data in the request. That way, a user can be made admin, or status can be changed unintentionally.
So we need to restrict what parameters we accept from the request. Use the $reqeust->only() :$user = User::create($request->only(['name', 'email', 'password']);
We can also add a validation rule, and get data from $reqeust->validated() –$user = User::create($reqeust->validated());
We can also use $guarded attribute in the model to prevent some table columns in a mass mass-assigned-protected $guarded = ['is_admin'];
A custom accessor allows us to define a computed attribute.
To define a custom accessor, we need to define a function in the model that starts with “get” and ends with “Attribute“.
For example, if we want the full name from the fist_name and last_name attributes, then we can define the getFullNameAttribute() function in the model-class User extends Model
{
public function getFullNameAttribute()
{
return "{$this->first_name} {$this->last_name}";
}
}
Then we can access it as a normal model property-$user = User::find(1);
echo $user->full_name;
To add the computed attribute to the JSON response, use $append attribute in the model-class User extends Model {
protected $appends = ['full_name'];
}
Mutator in Laravel Eloquent allows us to automatically modify data before saving it to the database. It is useful for formatting input, encrypting data, and ensuring consistency.
To define a custom mutator, we need to define a function in the model that starts with “set” and ends with “Attribute“.class User extends Model
{
public function setFirstNameAttribute($value)
{
$this->attributes['first_name'] = strtolower($value);
}
public function setPasswordAttribute($value)
{
$this->attributes['password'] = bcrypt($value);
}
}
Here we are ensuring that when the first name is saved, it is transformed to lower case and the password is encrypted before save.
We can just normally set the values, and the transformation is done automatically-$user = new User();
$user->first_name = "BigBox";
$user->password = 'secret123';
$user->save();
Scope allows us to define reusable query logic inside the model. This makes code cleaner and maintainable.
Start a function name with ‘scope’, and this function accepts a query object.
class User extends Model{
public function scopeActive($query)
{
return $query->where('is_active', 1);
}
}
Then we can use it as –$activeUsers = User::active()->get();
We can also pass parameters to the query scope-class User extends Model
{
public function scopeRole($query, $role)
{
return $query->where('role', $role);
}
}
Then we can use it as –$admins = User::role('admin')->get();
$editors = User::role('editor')->get();
We can also combine multiple scope query-$activeAdmins = User::active()->role('admin')->get();
The $touches property in Laravel Eloquent ensures that when a related model is updated, the updated_at timestamp of its parent model is also automatically updated.class Comment extends Model
{
protected $touches = ['post'];
public function post()
{
return $this->belongsTo(Post::class);
}
}
Now, when we update a comment, the associated post is also updated(the updated_at field)-$comment = Comment::find(1);
$comment->text = "comment from BigBoxCode";
$comment->save();
Use this to keep the parent updated.
The when() method is useful when filtering query results only if a condition is met.$role = request('role');
$users = User::when($role, function ($query, $role) {
return $query->where('role', $role);
})->get();
⇾ If $role is provided, the query adds where(‘role’, $role).
⇾ If $role is null, the query runs without the condition.
We can set a default value of a database field in 2 ways-
⇾ In Database Migration:
use the default method on a field definition to set the define the default value of a field. Like,Schema::create('customers', function (Blueprint $table) {
$table->id();
$table->string('name');
$table->string('email')->unique();
$table->string('status')->default('active');
$table->string('country')->default('US');
$table->boolean('is_verified')->default(false);
$table->integer('loyalty_points')->default(0);
$table->timestamp('last_login_at')->nullable();
$table->timestamps();
});
This will set the default value in the database schema definition.
⇾ In Eqloquent Model:
Use the $attributes property to set the default value. You will need to set the fillable array to make the fields writable/changable-class Customer extends Model
{
protected $fillable = [
'name',
'email',
'status',
'country',
'is_verified',
'loyalty_points',
'last_login_at',
];
protected $attributes = [
'status' => 'active',
'country' => 'Bangladesh',
'is_verified' => false,
'loyalty_points' => 0,
];
}
Eloquent Relationship
Here are eloquent relationships-
⇾ One-to-One / Has One
⇾ One-to-Many / Has Many
⇾ Many-to-Many
⇾ Has-One-Through
⇾ Has-Many-Through
There are polymorphic relationships-
⇾ One-to-One Polymorphic
⇾ One-to-Many Polymorphic
⇾ Many-to-Many Polymorphic
Here are the tables-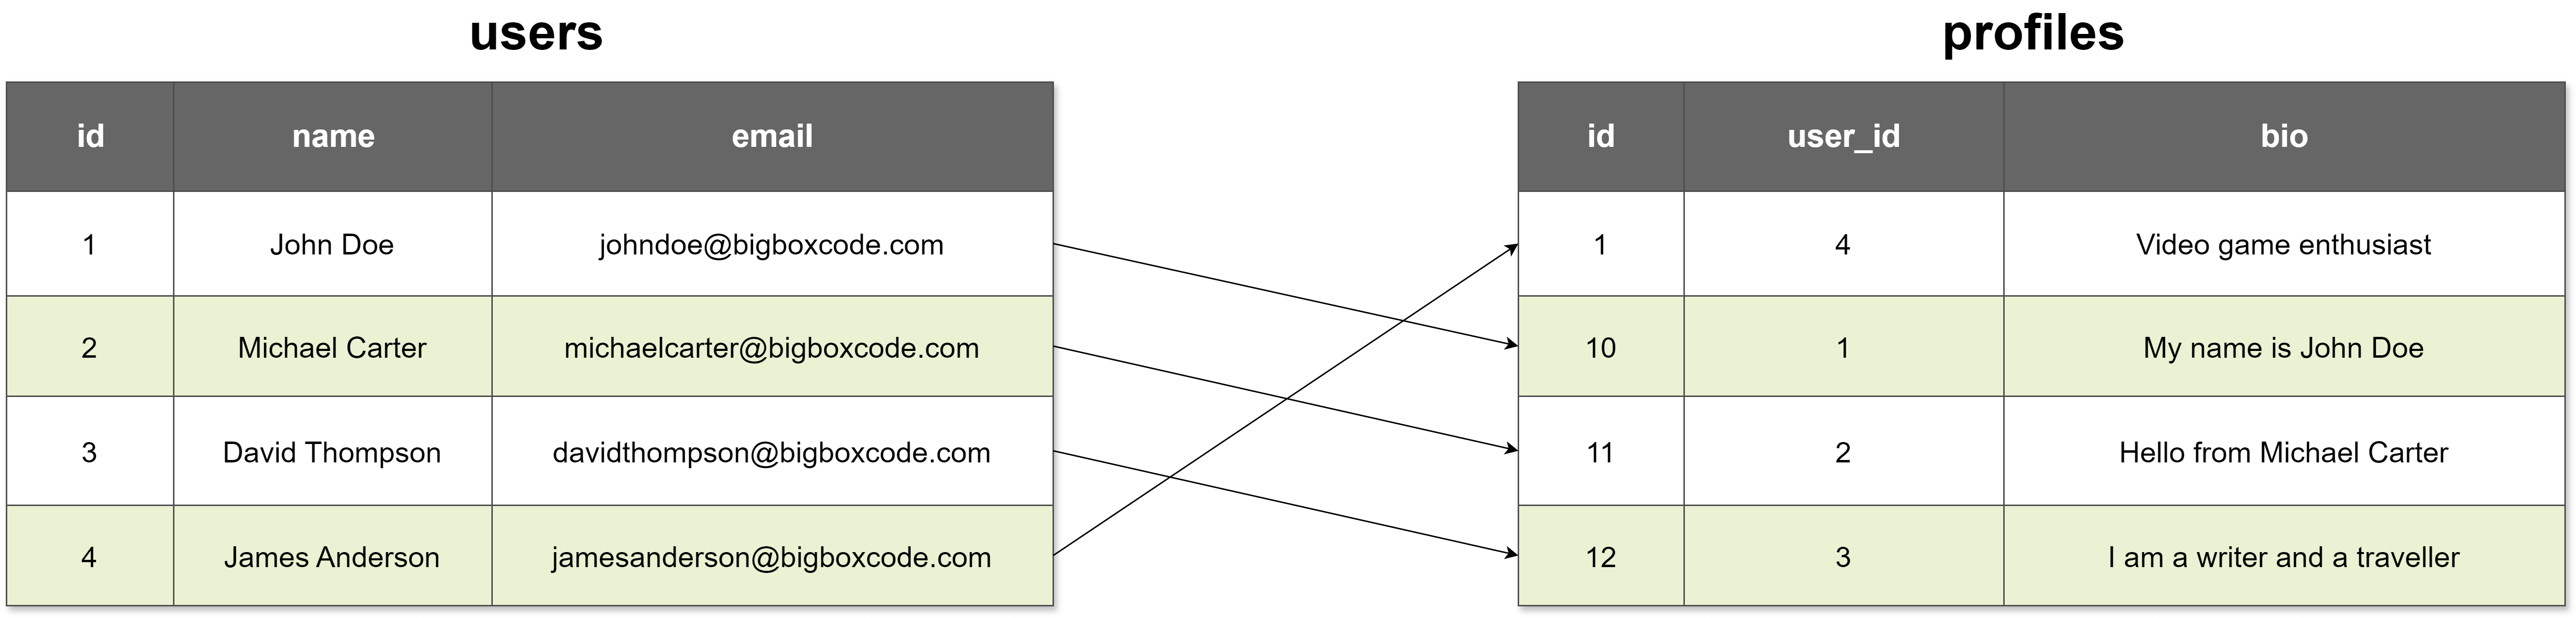
Here are the relationship definitions in the models-class User extends Model
{
public function profile(): HasOne
{
return $this->hasOne(Profile::class);
}
}
class Profile extends Model
{
public function user(): BelongsTo
{
return $this->belongsTo(User::class);
}
}
Here are the tables-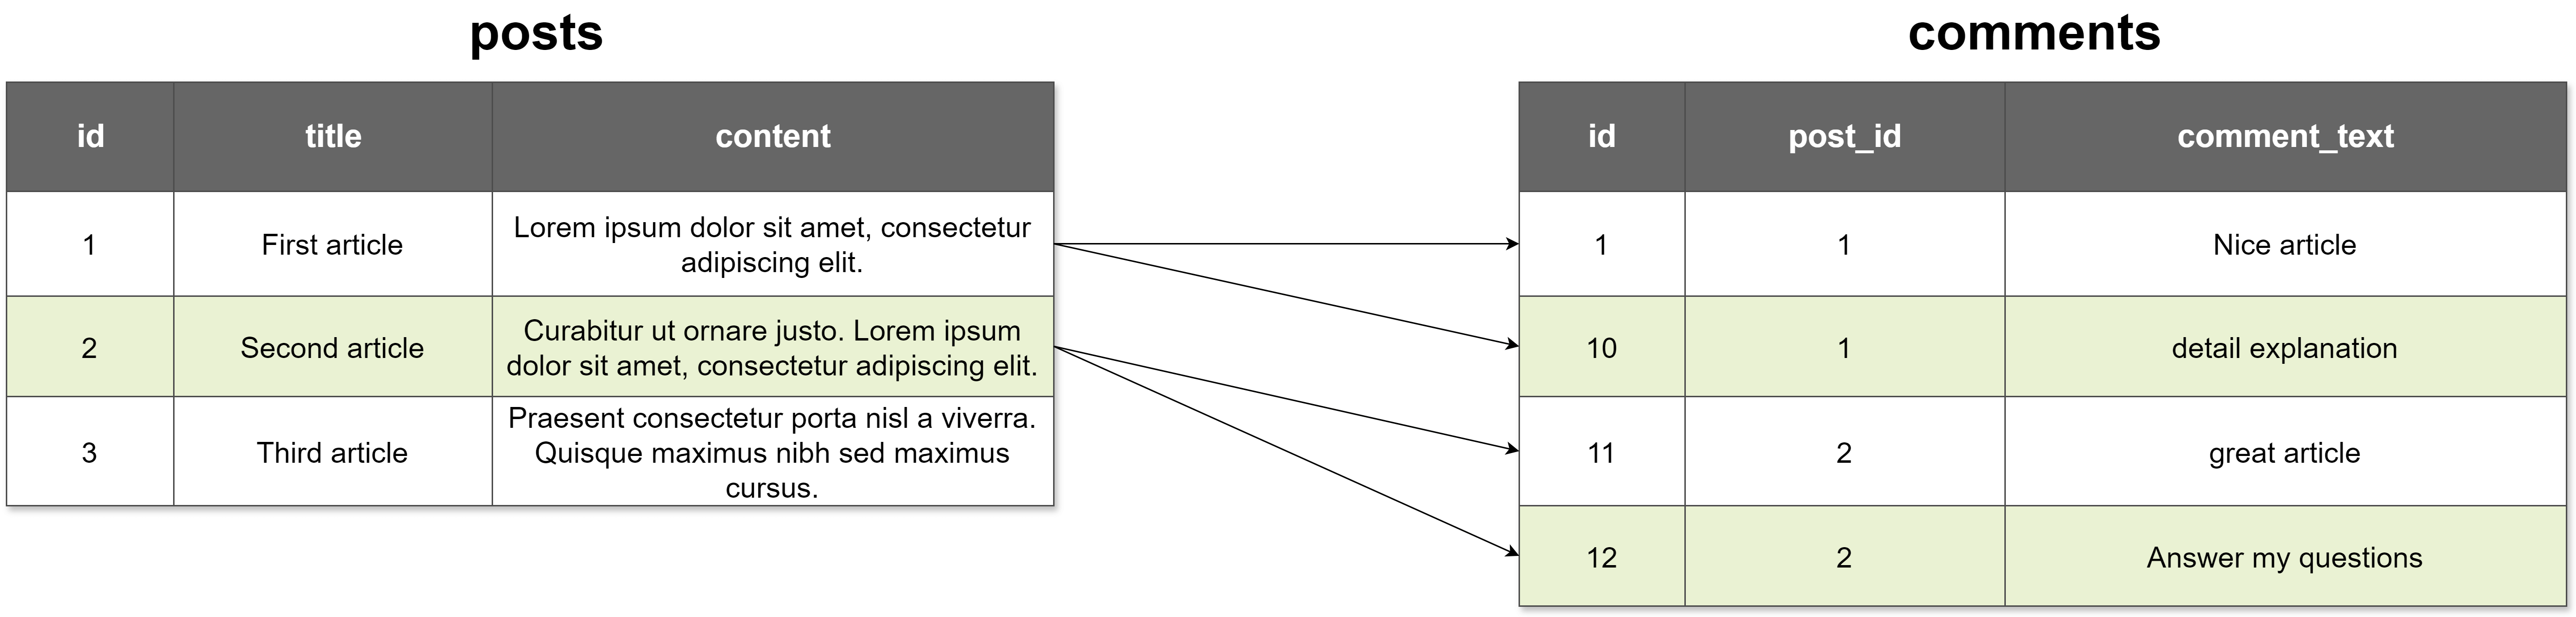
Relationship definitions in the models are as follows-class Post extends Model
{
public function comments(): HasMany
{
return $this->hasMany(Comment::class);
}
}
class Comment extends Model
{
public function post(): BelongsTo
{
return $this->belongsTo(Post::class);
}
}
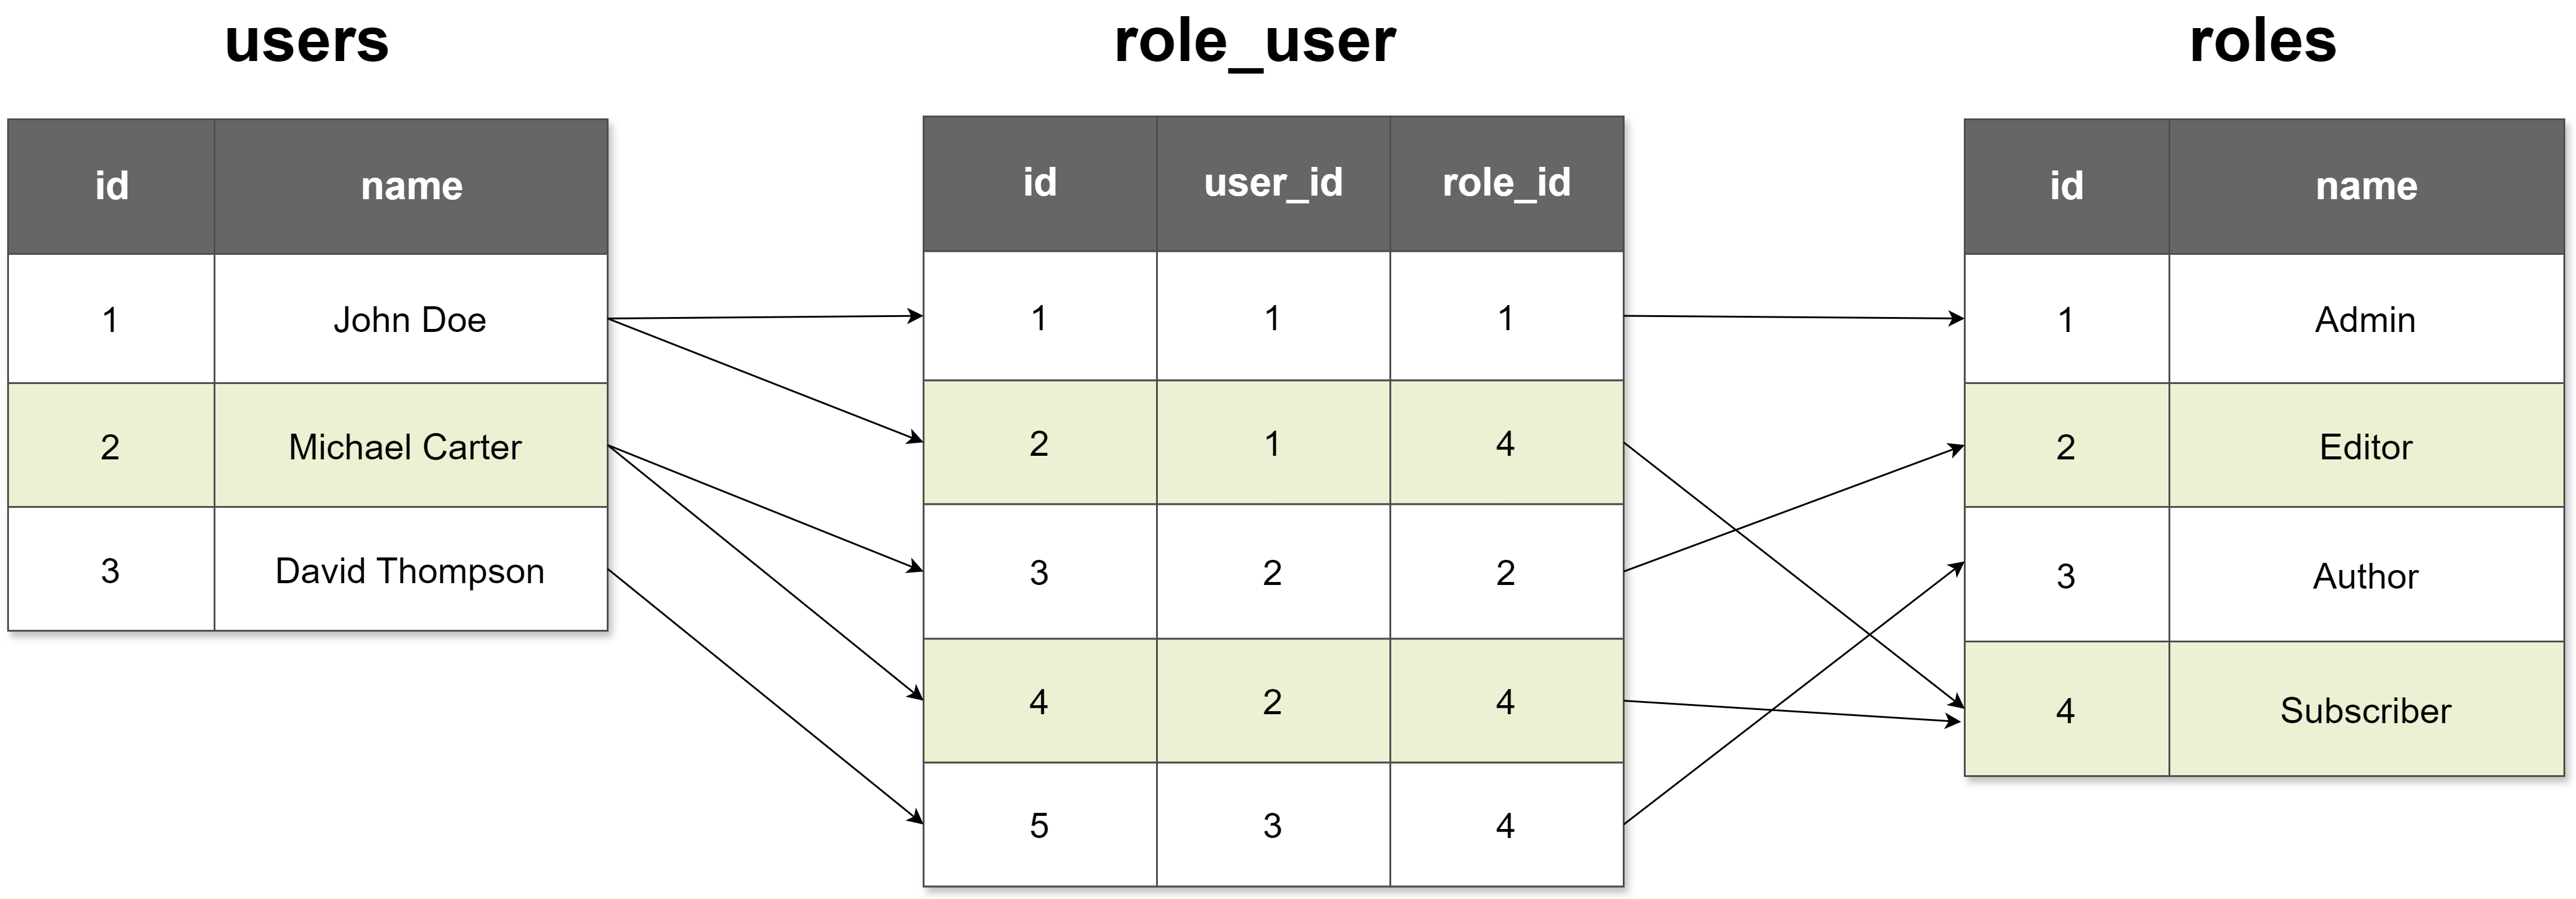
Here are the models-class User extends Model
{
public function roles(): BelongsToMany
{
return $this->belongsToMany(Role::class);
}
}
class Role extends Model
{
public function users(): BelongsToMany
{
return $this->belongsToMany(User::class);
}
}
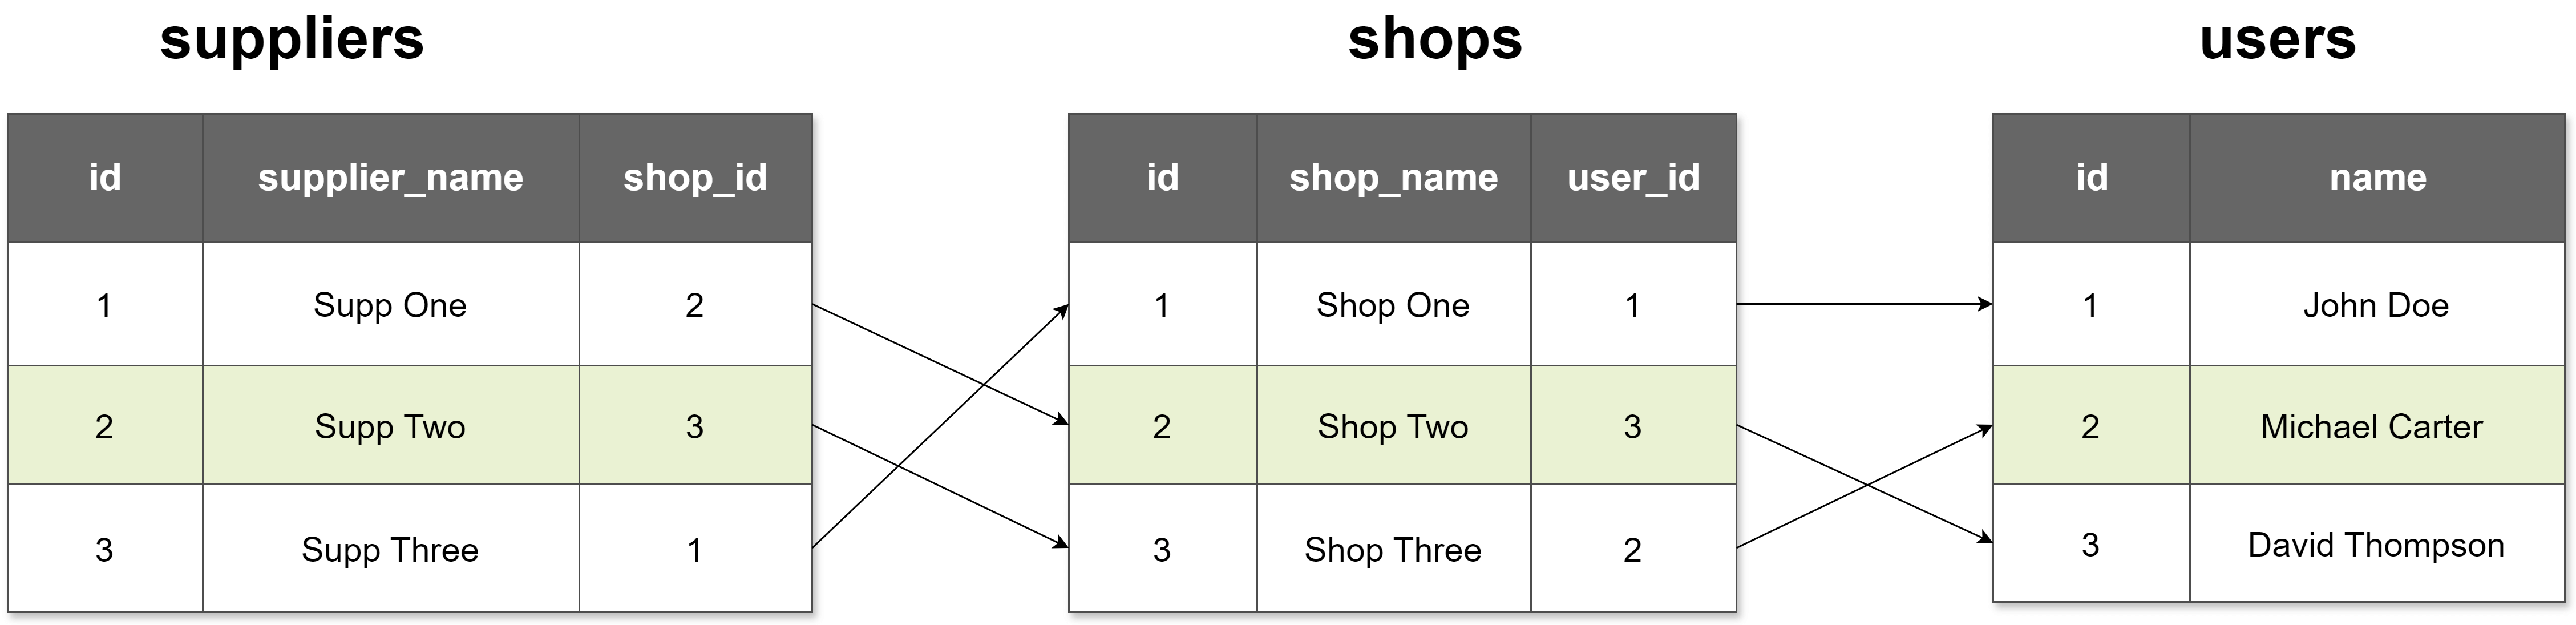
Here is the model definition-class Supplier extends Model
{
public function owner(): HasOneThrough
{
return $this->hasOneThrough(User::class, Shop::class);
}
}
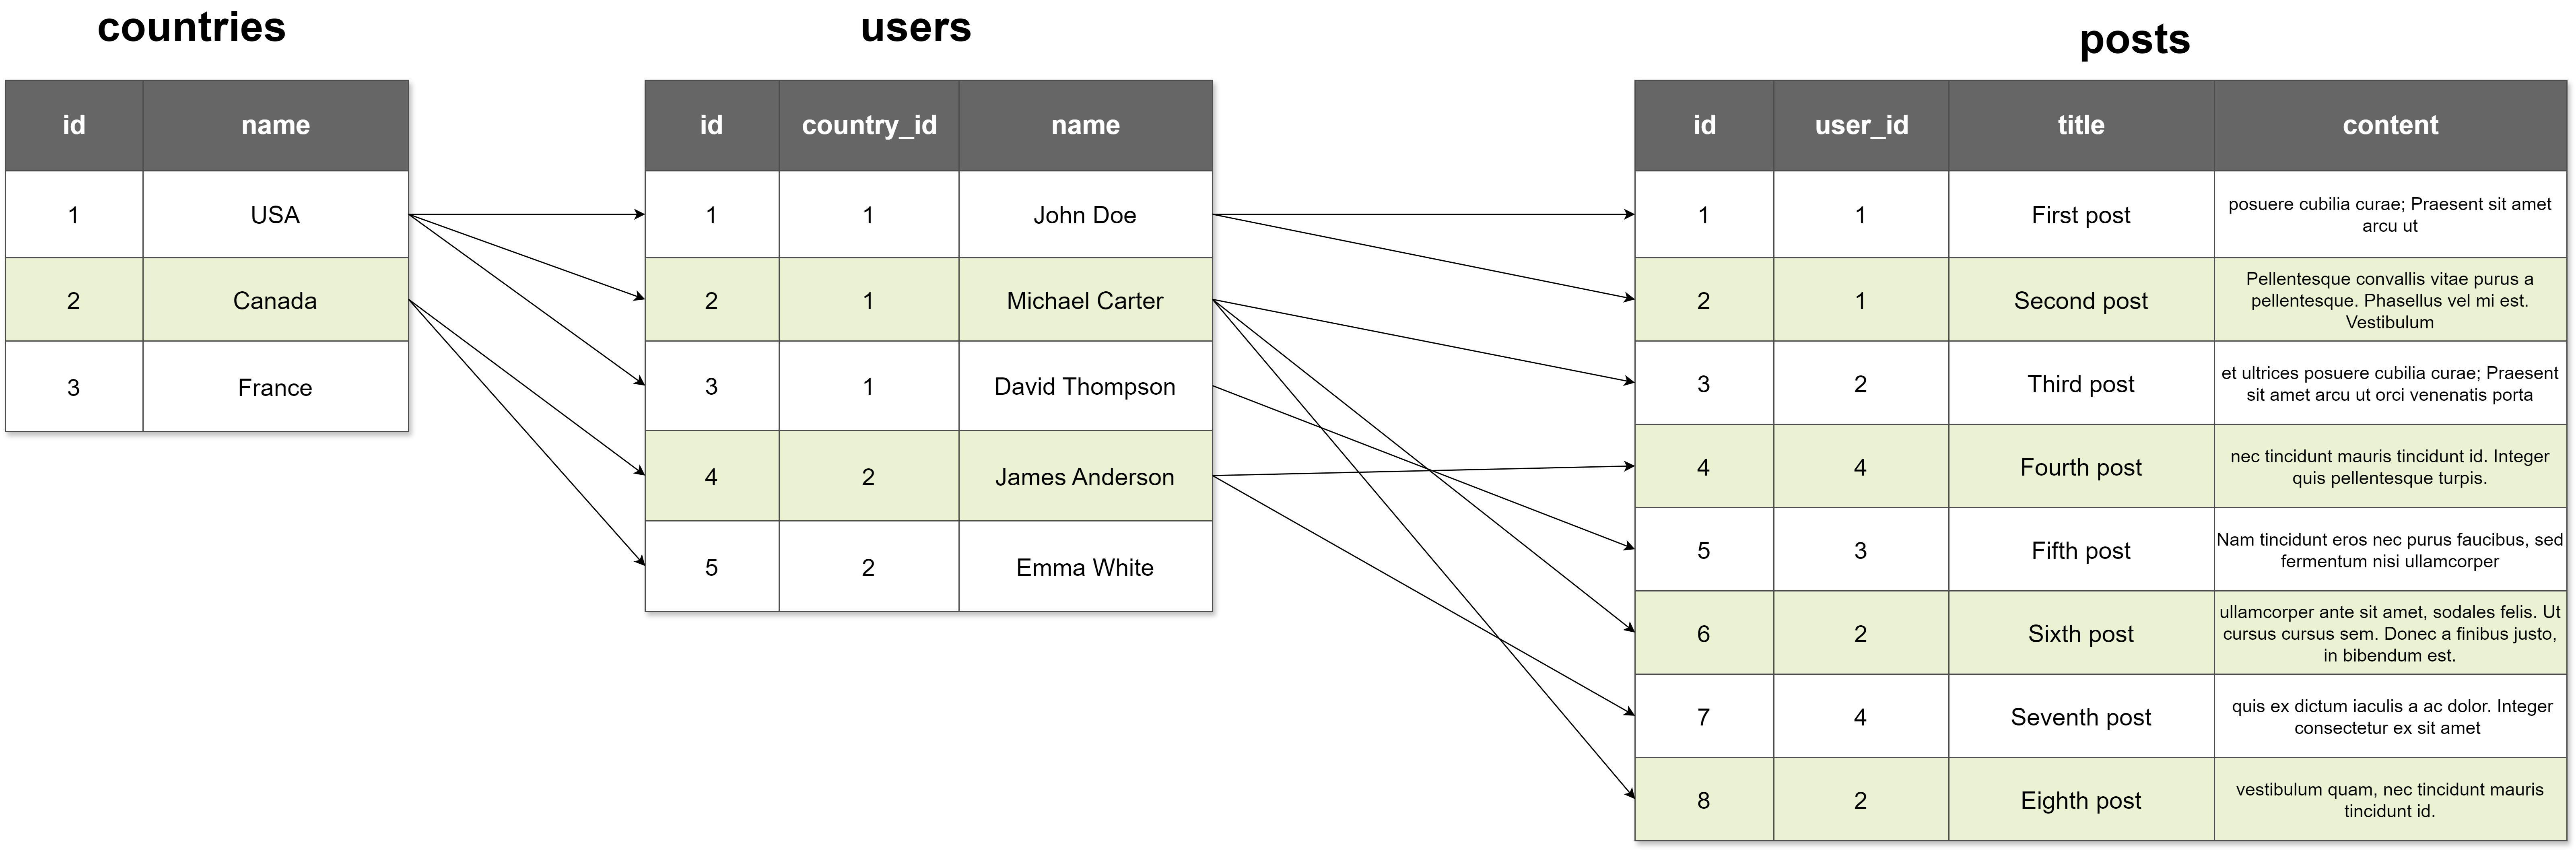
Here is how we can get posts for a country, in the Country model-class Country extends Model
{
public function posts(): HasManyThrough
{
return $this->hasManyThrough(Post::class, User::class);
}
}
Here is the migration we need to ‘photos’ table-Schema::create('photos', function (Blueprint $table) {
$table->id();
$table->string('url');
$table->morphs('imageable');
$table->timestamps();
});
This is how the tables look like-
Here is how we can get photos in user, and post model-class Photo extends Model
{
public function imageable(): MorphTo
{
return $this->morphTo();
}
}
class User extends Model
{
public function photos(): MorphOne
{
return $this->morphOne(Photo::class, 'imageable');
}
}
class Post extends Model
{
public function photos(): MorphOne
{
return $this->morphOne(Photo::class, 'imageable');
}
}
Here is the migration we need to ‘photos’ table-Schema::create('photos', function (Blueprint $table) {
$table->id();
$table->string('url');
$table->morphs('imageable');
$table->timestamps();
});
This is how the tables look like-
Here is how we can get photos in user and post model-class Photo extends Model
{
public function imageable(): MorphTo
{
return $this->morphTo();
}
}
class User extends Model
{
public function photos(): MorphMany
{
return $this->morphMany(Photo::class, 'imageable');
}
}
class Post extends Model
{
public function photos(): MorphMany
{
return $this->morphMany(Photo::class, 'imageable');
}
}
Here is the migration for taggable-Schema::create('tags', function (Blueprint $table) {
$table->id();
$table->string('name');
$table->timestamps();
});
Schema::create('taggables', function (Blueprint $table) {
$table->foreignId('tag_id')->constrained()->onDelete('cascade');
$table->morphs('taggable');
});
Here is the diagram of all the related tables-
Here are the relation definitions in the models-class Tag extends Model
{
public function taggables()
{
return $this->morphToMany(Taggable::class, 'taggable');
}
}
class Post extends Model
{
public function tags()
{
return $this->morphToMany(Tag::class, 'taggable');
}
}
class Video extends Model
{
public function tags()
{
return $this->morphToMany(Tag::class, 'taggable');
}
}
For a polymorphic relation, we save the id and the model name in the table. If we want to avoid storing the full model name, and want to store a simple alias, then we can define a map like below-Relation::enforceMorphMap([
'post' => 'App\Models\Post',
'video' => 'App\Models\Video',
]);
Add this to the boot() method in the AppServiceProvider, and then ‘post’ and ‘video’ will be saved and the morph type in the table.
hasOne() –
⇾ Defines the ownership of a related model.
⇾ Used in the parent model to specify that it has one related model.
⇾ The foreign key is on the child table.
belongsTo() –
⇾ Defines the inverse relationship.
⇾ Used in the child model to specify that it belongs to a parent model.
⇾ The foreign key is stored in the child table.
hasManyThrough() –
⇾ Defines a one-to-many relationship through an intermediate model.
⇾ Used when Model A has many Model C through Model B.
hasOneThrough() –
⇾ Defines a one-to-one relationship through an intermediate model.
⇾ Used when Model A has one Model C through Model B.
has() gets the record if there is a related record of specific relationship-$users = User:has('post')->get();
This only gets those users who have at least one post.
We can also use whereHas() for a similar purpose-$users = User::whereHas('post', function ($query) {
$query->where('status', 'published');
})->get();
This returns only the users, who have at least one post in published status.
Say we have users and posts that belong to user. Now we run the following code-$users = User::all();
foreach ($users as $user) {
echo $user->posts->count();
}
We get all other users with one query, but in the loop, we are getting $user->posts, so the posts query will run separately for each user.
This is called lazy loading, as we are loading the posts later, when we need them.
This causes the N+1 problem-
⇾ 1 query to get the user.
⇾ N queries for getting the posts, 1 for each user (assuming there are N number of users).
with() is used to perform eager loading of related models, to reduce the number of queries(N+1 problem) –$users = User::with('posts')->get();
This loads all users, and their posts.$users = User::with(['posts' => function ($query) {
$query->where('status', 'published');
}])->get();
This loads all users, and with that loads posts that are in published status.
Query Builder
Laravel query builder is an API provided by the Laravel framework, that we can use to interact with the database, in a fluent and expressive way.
⇾ We can use the query builder and query the database, without writing raw SQL queries.
⇾ Provides an easy-to-use, chainable interface for writing queries.
⇾ Automatically escapes parameters, to prevent SQL injection.
Eloquent ORM:
⇾ Uses Active Record pattern.
⇾ Imphesise on models(object to represent data), and relation between models(for database table relations).
Query Builder:
⇾ Uses Fluent Interface pattern.
⇾ Use it when we want to build complex queries without a model, when performance and flexibility are the priority.
$users = DB::table('users')
    ->where('age', '>', 18)
    ->where('name', 'BigBoxCode')
    ->join('posts', 'users.id', '=', 'posts.user_id')
    ->select('users.name', 'users.email', 'posts.title')
    ->orderBy('users.name')
    ->limit(10)
    ->get();
join() (INNER JOIN) –$usersWithOrders = DB::table('users')
->join('orders', 'users.id', '=', 'orders.user_id')
->select('users.name', 'orders.product')
->get();
leftJoin() (LEFT OUTER JOIN) –$usersWithOrders = DB::table('users')
->leftJoin('orders', 'users.id', '=', 'orders.user_id')
->select('users.name', 'orders.product')
->get();
rightJoin() (RIGHT OUTER JOIN) –$ordersWithUsers = DB::table('orders')
->rightJoin('users', 'orders.user_id', '=', 'users.id')
->select('users.name', 'orders.product')
->get();
crossJoin() (CROSS JOIN) –$crossJoinResult = DB::table('users')
->crossJoin('orders')
->select('users.name', 'orders.product')
->get();
union() –$usersWithOrders = DB::table('users')
->select('name', 'email')
->union(
DB::table('customers')->select('name', 'email')
)->get();
Or, we can use it like below-$usersWithOrders = DB::table('users')
->select('name', 'email')
->unionAll(
DB::table('customers')->select('name', 'email')
)
->get();
unionAll() –$usersWithOrders = DB::table('users')
->select('name', 'email')
->unionAll(
DB::table('customers')->select('name', 'email')
)->get();
Transactions
A database is a sequence of one or more database operations, that are executed as a single unit. It ensures-
⇾ Atomicity – ensures that all operations in a transaction are treated as a single unit; either all operations succeed or all fail.
⇾ Consistency – ensures database state change, by bringing database from one valid state to another valid state.
⇾ Isolation – each transaction is executed, and intermediate states of a transaction are not visible to other transactions until complete.
⇾ Durability – once a transaction is committed, the changes are permanent.
Transactions are used to maintain data integrity and prevent data corruption.
Use the transaction-related method from DB facade, for a database transaction operation-
⇾ DB::beginTransaction() – start a transaction.
⇾ DB::commit() – commit all the changes done by the operations in a transaction.
⇾ DB::rollBack() – revert the changes(intermediate), if any error occurs.
Here is an example with e-commerce order placement-DB::beginTransaction();
try {
$product = Product::findOrFail($productId);
if ($product->stock < $quantity) {
throw new \Exception('Not enough stock available.');
}
$product->stock -= $quantity;
$product->save();
$order = Order::create([
'user_id' => $userId,
'product_id' => $productId,
'quantity' => $quantity,
'status' => 'pending',
'total_price' => $product->price * $quantity,
]);
$payment = Payment::create([
'order_id' => $order->id,
'amount' => $order->total_price,
'payment_method' => $paymentDetails['method'],
'payment_status' => 'pending',
]);
if (!$this->processPayment($paymentDetails)) {
throw new \Exception('Payment failed.');
}
$payment->payment_status = 'completed';
$payment->save();
$order->status = 'completed';
$order->save();
DB::commit();
} catch (\Exception $e) {
DB::rollBack();
}
public function placeOrder($userId, $productId, $quantity) {
    return DB::transaction(function () use ($userId, $productId, $quantity) {

        $product = Product::findOrFail($productId);
        if ($product->stock < $quantity) {
            throw new \Exception('Insufficient stock.');
        }
        $product->stock -= $quantity; $product->save();
        $order = Order::create([
            'user_id' => $userId,
            'product_id' => $productId,
           'quantity' => $quantity,
           'status' => 'pending',
            'total_price' => $product->price * $quantity,
        ]);

        return response()->json([ 'message' => 'Order placed successfully.', 'order' => $order ], 200); });
}
⇾ We do not need to handle the transaction commit and rollback manually.
⇾ Wraps all database operations inside a single transaction.
⇾ If any error occurs, all changes are automatically rolled back.
⇾ Any Eloquent operation can be performed inside the transaction.
DB::transaction()–
⇾ Automatic rollback if any exception occurs inside the closure.
⇾ Less code to write, no need to manually handle beginTransaction() and commit().
⇾ Recommended for most cases where transaction rollback is required on failure.
DB::beginTransaction()–
⇾ Gives more control, allows custom rollback logic based on conditions.
⇾ Useful for complex transactions that require additional operations before rollback.
⇾ Recommended when transactions need to be committed partially or checked before committing.
⇾ If you want the inner transaction to fail silently, then do nothing in the catch of the inner transaction-DB::transaction(function () {
$order = Order::create([
'user_id' => 1,
'status' => 'pending'
]);
try {
DB::transaction(function () use ($order) {
Payment::create([
'order_id' => $order->id,
'amount' => 100,
'status' => 'success'
]);
throw new \Exception('Payment failed!');
});
} catch (\Exception $e) {
logger()->error("Inner transaction failed: " . $e->getMessage());
}
});
⇾ If you want to roll back the parent transaction, if an inner transaction fail, then throw exception in the catch of the inner transaction-DB::transaction(function () {
$order = Order::create([
'user_id' => 1,
'status' => 'pending'
]);
try {
DB::transaction(function () use ($order) {
Payment::create([
'order_id' => $order->id,
'amount' => 100,
'status' => 'success'
]);
throw new \Exception('Payment failed!');
});
} catch (\Exception $e) {
// Force full rollback by throwing an exception
throw new \Exception("Transaction failed: " . $e->getMessage());
}
});
Yes, Laravel supports database transactions across multiple databases.
However, it does not provide automatic transaction handling for multiple connections. We must manually manage transactions for each database connection.try {
// Start transaction on both databases
DB::connection('mysql')->beginTransaction();
DB::connection('pgsql')->beginTransaction();
// Perform operations on MySQL database
DB::connection('mysql')->table('users')->insert([
'name' => 'John Doe',
'email' => 'john@example.com'
]);
// Perform operations on PostgreSQL database
DB::connection('pgsql')->table('orders')->insert([
'user_id' => 1,
'amount' => 100.00
]);
// Commit transactions on both databases
DB::connection('mysql')->commit();
DB::connection('pgsql')->commit();
} catch (\Exception $e) {
// Rollback transactions if any error occurs
DB::connection('mysql')->rollBack();
DB::connection('pgsql')->rollBack();
throw $e;
}
Set transaction isolation levels using raw SQL commands before starting a transaction.DB::statement('SET TRANSACTION ISOLATION LEVEL SERIALIZABLE');
DB::transaction(function () {
DB::table('orders')->insert([
'user_id' => 1,
'total_amount' => 500
]);
DB::table('transactions')->insert([
'order_id' => DB::getPdo()->lastInsertId(),
'status' => 'pending'
]);
});
A transaction ensures atomic operations, so the data in one transaction is not corrupted by another while running. But a race condition can occure.
To prevent a row from being changed in between, we can lock it use lockForUpdate()-DB::transaction(function () {
$product = DB::table('products')->where('id', 1)->lockForUpdate()->first();
if ($product->stock > 0) {
DB::table('products')->where('id', 1)->decrement('stock');
} else {
throw new Exception('Not enough stock available');
}
});
This will lock the row of products table, and will keep it locked until the transaction is complete.
If you don’t commit or roll back a transaction in Laravel, it can lead to several issues:
⇾ If you don’t call commit() after making changes to the database within a transaction, the changes will not be saved to the database.
⇾ If you don’t commit or roll back a transaction, the database connection will remain open.
⇾ The database connection will stay open, which can cause connection pooling problems.
⇾ If the transaction was supposed to lock rows (e.g., using lockForUpdate()), those locks will remain until the transaction is committed or rolled back.
Observer
An Observer in Laravel is a class that listens for Eloquent model events and executes logic when those events occur.
Laravel models fire several events during their lifecycle-
⇾ creating – before a new record is inserted.
⇾ created – after a new record is inserted.
⇾ updating – before existing record is updated.
⇾ updated – after existing record is updated.
⇾ deleting – before a record is deleted.
⇾ deleted – after a record is deleted.
⇾ restoring – before a soft-deleted record is restored.
⇾ restored – after a soft-deleted record is restored.
⇾ forceDeleting – before a permanent deletion of record.
⇾ forceDeleted – after a permanent deletion of record.
⇾ Logging and auditing.
⇾ Sending notifications.
⇾ Automatically generating certain field value(like slug, total, etc.).
⇾ Updating related records(like, status, sum, related models, etc.).
⇾ Preventing unauthorized deletion.
⇾ Caching and cache invalidation.
⇾ Soft deleting related records.
⇾ Maintaining an activity log.
⇾ Handling related events.
Create an observer for a model, using followign command –php artisan make:observer CustomerObserver --model=Customer
Update the overserver file app/Observers/CustomerObserver.php. Update the file with code that has the function name of the triggered events-class CustomerObserver
{
public function created(Customer $customer)
{
Log::info("New customer created: {$customer->name} ({$customer->email})");
}
public function updated(Customer $customer)
{
Log::info("Customer updated: {$customer->id}");
}
public function deleted(Customer $customer)
{
Log::warning("Customer deleted: {$customer->id}");
}
public function forceDeleted(Customer $customer)
{
Log::warning("Customer permanently deleted: {$customer->id}");
}
public function restored(Customer $customer)
{
Log::info("Customer restored: {$customer->id}");
}
}
Generate a service provider app/Providers/EventServiceProvider.php and register the observer in the boot method-public function boot()
{
Customer::observe(CustomerObserver::class);
}
Now whenever a customer model is created, updated, or deleted, you will see a log in the storage/logs/laravel.log file.
After creating an observer, you can add the ObservedBy attribute on the model-#[ObservedBy([CustomerObserver::class])]
class User extends Model
{
}
Or, you can register the observer in the boot method of the service provider-public function boot(): void
{
Customer::observe(CustomerObserver::class);
}
You can create event(s) and listener(s), then dispatch those events for triggers in the model.
Say we have an event named CustomerEvent, that accepts a customer object and type of event(as string)-class CustomerEvent
{
use Dispatchable, SerializesModels;
public $customer;
public $eventType;
public function __construct(Customer $customer, string $eventType)
{
$this->customer = $customer;
$this->eventType = $eventType;
}
}
Then we can dispatch those events in the model, and register those in model booted() method-
class Customer extends Model{
protected $fillable = ['name', 'email'];
protected static function booted()
{
static::created(function ($customer) {
event(new CustomerEvent($customer, 'created'));
});
static::deleted(function ($customer) {
event(new CustomerEvent($customer, 'deleted'));
});
}
}
In a Laravel Observer, you can prevent an action (such as saving or updating a record) by returning false inside the corresponding event method.class CustomerObserver
{
public function updating(Customer $customer)
{
if ($customer->is_admin) {
return false;
}
// Other operations here
}
}
When an exception is thrown inside an Observer, it can break the execution flow of your application. To handle this properly, we should catch the exception and take appropriate actions-class CustomerObserver
{
public function updating(Customer $customer)
{
try {
// Example: Prevent updates if email contains 'test'
if (str_contains($customer->email, 'test')) {
throw new Exception("Updating customers with 'test' in email is not allowed.");
}
} catch (Exception $e) {
// Log the exception for debugging
Log::error("Customer update failed: " . $e->getMessage());
// Optionally, rethrow or handle the error differently
return false; // Prevent update from proceeding
}
}
}
A model can have multiple observers, but since Laravel does not support multiple observers natively in observe(), you have to call observe() multiple times for the same model.
For that, create multiple observers for the same model-php artisan make:observer CustomerActivityObserver --model=Customerphp artisan make:observer CustomerNotificationObserver --model=Customer
Define the trigger methods in the observers.
Then we can register those with any of the following method-
⇾ ObservedBy attribute to the model-#[ObservedBy([CustomerActivityObserver::class, CustomerNotificationObserver::class])]
class Customer extends Model
{
}
⇾ Or we can do it in the model, like below-class Customer extends Model
{
protected static function boot()
{
parent::boot();
static::observe(CustomerActivityObserver::class);
static::observe(CustomerNotificationObserver::class);
}
}
⇾ If we want to register those in the boot() method in service provider, then we can use multiple observe() statements-public function boot()
{
Customer::observe(CustomerActivityObserver::class);
Customer::observe(CustomerNotificationObserver::class);
}
In the following cases we should avoid observers-
⇾ Performance Concerns with Large Datasets.
⇾ When Business Logic Becomes Hard to Trace.
⇾ When Events & Listeners Are More Suitable.
⇾ When You Need Different Behaviors in Different Contexts.
⇾ When Observers Create Circular Dependencies.
⇾ When You Need More Flexibility with Testing.
Try any of the following tricks. One or more of these might apply based on your use case-
⇾ Disable Observers for Bulk Operations.
⇾ Use Event Listeners Instead of Observers.
⇾ Optimize Database Queries Inside Observers.
⇾ Use Database Transactions for Batch Processing.
⇾ Use Condition-Based Execution in Observers.
⇾ Process Observers in Batches.
⇾ Monitor Performance and Log Slow Operations.
Query Optimization
We can add(and/or remove) indexes in database migrations.
⇾ Add primary key index.Schema::table('users', function (Blueprint $table) {
$table->primary('id');
});
⇾ Add unique index.Schema::table('users', function (Blueprint $table) {
$table->unique('username');
});
⇾ Add standard index.Schema::table('users', function (Blueprint $table) {
$table->index('email');
});
⇾ Add multi-column index.Schema::table('orders', function (Blueprint $table) {
$table->index(['user_id', 'status']);
});
⇾ Use Full-Text Index for Searching.Schema::table('articles', function (Blueprint $table) {
$table->fullText('content');
});
⇾ Use Indexes for Foreign KeysSchema::table('orders', function (Blueprint $table) {
$table->foreignId('customer_id')->constrained()->index();
});
⇾ Use Partial Indexes for Specific Conditions.$table->index(['email'], 'active_users')->where('status', 'active');
⇾ Drop Unused Indexes.Schema::table('users', function (Blueprint $table) {
$table->dropIndex(['email']);
});
⇾ Problem: Understanding the N+1 query problem-$posts = Post::all();
foreach ($posts as $post) {
echo $post->user->name;
}
This runs 1 query for getting all the post. Then in the loop it runs a query to get users of the post, every time the loop runs. So a large number of queries are run to get user of the post. If the number of posts is N, then N umber of queries runs to get the user.
⇾ Solution: Using with() to eager load relationships-$posts = Post::with('user')->get();
foreach ($posts as $post) {
echo $post->user->name;
}
This code will run 2 queries-
– SELECT * FROM posts;
– SELECT * FROM users WHERE id IN (1, 2, 3, ...);
⇾ Using load() for lazy eager loading. If you’ve already fetched the posts but forgot to eager load users, you can use load()-$posts = Post::all();
$posts->load('user');
⇾ Use withCount() to optimize count queries. If you want to count the number of related models, use withCount()-$users = User::withCount('posts')->get();
foreach ($users as $user) {
echo $user->posts_count;
}
⇾ Using withSum(), withAvg(), and Aggregates. You can also optimize sum, avg, min, and max queries-$users = User::withSum('orders', 'total_price')->get();
foreach ($users as $user) {
echo $user->orders_sum_total_price;
}
⇾ Using chunk() to process large dataset. When dealing with large datasets, use chunk() to avoid memory overload-User::with('posts')->chunk(100, function ($users) {
foreach ($users as $user) {
echo $user->name;
}
});
⇾ Using lazy() for even more efficient chunking. If chunk() loads too much memory, use lazy() for better streaming-foreach (User::with('posts')->lazy() as $user) {
echo $user->name;
}
⇾ Using Selective Columns Instead of fetching all columns-$posts = Post::with('user:id,name')->get(['id', 'title', 'user_id']);
⇾ Using join() instead of relationship for large dataset. If performance is critical, using join() might be faster than Eloquent relations-$posts = DB::table('posts')
->join('users', 'posts.user_id', '=', 'users.id')
->select('posts.title', 'users.name')
->get();
⇾ Caching queries for faster performance. Use Laravel’s query caching to avoid hitting the database repeatedly-$posts = Cache::remember('posts_with_users', 60, function () {
return Post::with('user')->get();
});
The chunk() method in Laravel Eloquent is used to process large datasets efficiently without loading all records at once.
⇾ The chunk() method in Laravel fetches a certain number of records at a time and continues fetching the next batch of records until all records are processed.User::chunk(100, function ($users) {
foreach ($users as $user) {
echo $user->name . PHP_EOL;
}
});
⇾ Process record update in chunks-User::chunk(100, function ($users) {
foreach ($users as $user) {
$user->update(['status' => 'active']);
}
});
⇾ Use the chunkById() for deleting effectively to avoid conflicts-User::chunkById(100, function ($users) {
foreach ($users as $user) {
$user->delete();
}
});
Job batching in Laravel allows you to group multiple jobs together and track their progress. This is useful for processing large tasks in parallel.
Here are the key points about job batches-
⇾ Process the jobs in parallel.
⇾ Works well for large data processing tasks.
⇾ Uses job_batches to store the batch metadata.
Before creating batch queues, make sure the queue is set up properly. If not, run the following commands-php artisan queue:table
php artisan migrate
Also run the queue processing command in the background-php artisan queue:work
Let’s create job for processing order-php artisan make:job ProcessOrders
In the ProcessOrders write the steps for order processing-class ProcessOrders implements ShouldQueue
{
use Dispatchable, InteractsWithQueue, Queueable, SerializesModels;
public $order;
public function __construct($order)
{
$this->order = $order;
}
public function handle()
{
\Log::info("Processing order: " . $this->order->id);
// Write code for order processing
}
}
Now we can define the batch processing like bellow-public function processOrdersBatch()
{
$orders = Order::where('status', 'pending')->get();
$batch = Bus::batch([])
->then(function (Batch $batch) {
Log::info('All jobs in the batch completed successfully.');
})
->catch(function (Batch $batch, Throwable $e) {
Log::error('A job in the batch failed.');
})
->finally(function (Batch $batch) {
Log::info('Batch processing completed.');
})
->dispatch();
// Add jobs to the batch
foreach ($orders as $order) {
$batch->add(new ProcessOrders($order));
}
return response()->json(['batch_id' => $batch->id]);
}
⇾ The simplest way is to log the queries. Add the following code to the boot() method of any service provider(or create a new provider for query logging, and add this to the boot() method) –if (config('app.debug')) {
\DB::listen(function ($query) {
\Log::channel('query')->debug($query->sql, [
'bindings' => $query->bindings,
'time' => $query->time . 'ms',
'connection' => $query->connectionName,
// 'stack_trace' => debug_backtrace(DEBUG_BACKTRACE_IGNORE_ARGS, 5),
]);
});
}
The main thing here is the DB::listen(). This listens to all the queries executed by query builder and Eloquent ORM.
Here we are only logging in debug mode, and the log saves the query, and execution time information.
⇾ We can also use packages like- Laravel Debugbar, Telescope, or Laravel Clockwork.
⇾ We can log the slow query in the database (this technique is done on the database fully, no changes required in the laravel code).
⇾ If you want to just dump the SQL of a query then use the toSQL()-$query = DB::table('orders')->where('status', 'pending');
dd($query->toSql());
Then, we can use EXPLAIN in the database to check the query performance.
⇾ Bulk insert data, to insert multiple rows in a single query-$data = [];
for ($i = 0; $i < 1000; $i++) {
$data[] = [
'name' => "Customer $i",
'email' => "customer$i@bigboxcode.com",
'created_at' => now(),
'updated_at' => now()
];
}
// Inserts all 1000 records in a single query
DB::table('customers')->insert($data);
⇾ Additionally, you can use chunk to process data in batches-collect(range(1, 100000))->chunk(1000)->each(function ($chunk) {
$data = $chunk->map(fn($i) => [
'name' => "Customer $i",
'email' => "customer$i@bigboxcode.com",
'created_at' => now(),
'updated_at' => now()
])->toArray();
DB::table('customers')->insert($data);
});
To limit the query execution time, we have to set max_exectuion_time in MySQL. We can do it as below-DB::statement('SET SESSION max_execution_time=2000'); // 2000 ms = 2 seconds
$results = DB::table('users')->where('status', 'active')->get();
For Postgres, we have to set steatement_timeout–DB::statement('SET statement_timeout TO 2000'); // 2000 ms = 2 seconds
$results = DB::table('users')->get();
toSQL() method is used to convert an Eloquent or Query Builder query into raw SQL.$query = DB::table('users')->where('status', 'active')->toSQL();
echo $query;
Works with eloquent, the same way-$query = User::where('email', 'like', '%@gmail.com%')->toSQL();
echo $query;
Alternatively to this, we can use DB::enableQueryLog() to start tracking the query, and then DB::getQueryLog() to get all the queries ran after enabling the log-DB::enableQueryLog();
User::where('status', 'active')->get();
dd(DB::getQueryLog());
You can also use dd() to dump the object represent of the query-User::where('status', 'active')->dd();
or,User::where('status', 'active')->dump();
Authentication & Authorization
We have several authentication option in our Laravel project.
Built-in authentication:
⇾ Session Based Auth(default)– use PHP session and cookie for traditional web apps.
⇾ Token Based Auth – basic API tokens implementation(single token per user). Tokens are stored in database.
⇾ HTTP Basic Auth – stateless auth using HTTP headers(username/password).
Sanctum (official package):
⇾ Token based authentication.
⇾ Lightweight.
⇾ Multi token support for single user.
Other options:
⇾ Passport – full implementation of OAuth2 server for APIs.
⇾ JWT – JSON Web Token based authentication.
Note: Sanctum is simpler to use than other packages like Passport.
bcrypt is a password hashing function(key derivation function), based on the Blowfish cipher. bcrypt is designed for secure password hashing.
Key Derivation Function(KDF): a key derivation function is a cryptographic algorithm that derives one or more secret keys from a password(or passphrase).
Cipher: a cipher is an algorithm used to encrypt or decrypt; it transforms plaintext to ciphertext or vice versa.
Here are the reasons for recommending bcrypt –
⇾ Slow by Design: the implementation is intentionally made slow to prefent bruteforce and rainbow table attacks.
⇾ Cost Control: you can configure how much resource will be used for the hashing algorithm; increasing in security level will increase the hardware usage.
⇾ Built-in Salt: automatically generates and store salt for each hash.
⇾ Non-reversible: the process is one way and once hashed, we can not retrieve the original string from the hashed output.
Other password hashing options in Laravel are “argon“, “argon2id“. Choosing “bcrypt” over these two are for the following reason-
⇾ Universally Supported: bcrypt is supported on all PHP version, and also widely used. while “argon” “argon2id” require laravel version >=7.2.
⇾ Simple Configuration: bcrypt has very simple const param configuration.
⇾ Widely Tested: tested for a long time, over a wide range of systems.
⇾ Slow and Strong: bcrypt is slow enough to resist brute force, speciall with high cost factors, for example by using rounds over 12.
Note: all hashing related configurations are in config/hashing.php file. And by default bcrypt is used for hashing.
Here is how we can use the bcrypt hashing in Laravel-<?php
use Illuminate\Support\Facades\Hash;
$password = 'bigboxpass';
// Hash password
// bcrypt is used by default, by the laravel framework
$hashed = Hash::make($password);
Use the check() method to check validity-<?php
// Verify password
if (Hash::check("bigboxpass", $hashed)) {
// Do something if password is valid
}
Security
General Security
SQL Injection
SQL Injection Prevention (Eloquent ORM & Query Builder)
CSRF (Cross-Site Request Forgery) Protection
XSS (Cross-Site Scripting) Protection
{{ }} and {!! !!} in Blade templates? e() helper function to escape output? Password Security & Hashing
Encryption & Secure Data Storage
encrypt() and decrypt() functions? .env file, and how should it be secured? .env file exposure in Laravel? Session & Cookie Security
API Security
Security Best Practices
config:cache command, and how does it enhance security? composer install --no-dev --optimize-autoloader in production? trustedproxy middleware, and why is it important in Laravel? Architecture
Model-View-Controller(MVC)
Explain the MVC architecture in Laravel.
How does Laravel follow the MVC architecture?
Design Patterns
Explain the repository pattern in Laravel.
What is the Repository Pattern, and how is it used in Laravel applications?
How does Laravel implement the Chain of Responsibility pattern in middleware?
How does Laravel handle dependency injection?
How does Laravel handle dependency resolution with the service container?
What are Laravel contracts, and how do they contribute to the architecture?
How does Laravel implement the Observer Pattern?
How does Laravel implement the Strategy Pattern in authentication?
Service Container
Service container is the powerful dependency injection container in Laravel. It is a big registry that is aware of how to create and manage object instances, and resolve their dependencies.
The Service Container handles resolving and injecting class dependencies.
When we ask for an object, with type-hint(in places like controller constructor), the service container is responsible for figuring out –
⇾ what to instantiate.
⇾ how to resolve its dependencies.
⇾ weather to return a shared(singeton) instance or not.
The following objects are instantiated before the service container –
⇾ App\Exceptions\Handler – instantiated during application bootstrapping, and registered in bootstrap/app.php, before providers.
⇾ App\Console\Kernel – instantiated during application bootstrapping.
⇾ App\Http\Kernel – instantiated during application bootstraping, before middleware / route registration.
⇾ FormRequest classes -instantiated during route resolution phase, before the controller is resolved.
⇾ Non-invokable Middleware (without container binding) – instantiated during middleware registration in the Kernel.
⇾ Closure-based Event Listeners – instantiated at event dispatch time, not resolved via container.
⇾ Closure-based Broadcast Handlers – instantiated at broadcast time, not resolved via container.
⇾ Console Commands (artisan commands) – instantiated during artisan command registration, only resolved via container if manually bound.
This means, no dependency injection is possible at that point.
What are service providers in Laravel?
How do service providers fit into the framework’s architecture?
What is a service provider in Laravel, and how does it work?
How do you create and register a custom service provider?
How does Laravel’s facade pattern work internally?
What is the difference between facades and dependency injection?
How do you use the `app()` helper function in Laravel?
Service Providers
Facades
Architecture & Patterns
What is the Laravel pipeline and how does it work?
How does Laravel handle dependency injection?
What are singleton bindings in Laravel?
How does Laravel handle request lifecycle?
Explain Laravel’s event-driven architecture.
How does Laravel implement the Pipeline Pattern?
What are some common architectural pitfalls in Laravel applications?
What is Domain-Driven Design (DDD) and how can you implement it in a Laravel project?
What are the benefits and drawbacks of using Laravel for monolithic vs. microservices-based applications?
How do you structure a large-scale Laravel application for maintainability?
How does Laravel Horizon differ from Laravel queues in terms of architecture?
Performance & Optimization
How do you optimize Laravel performance?
How do you cache data in Laravel?
Search & Indexing
What is Laravel Scout?
Queues & Background Jobs
How do you use queues in Laravel?
What are jobs and workers in Laravel?
What is the purpose of jobs and queues in Laravel’s architecture?
Events & Broadcasting
Explain Laravel broadcasting.
How do events and listeners fit into Laravel’s architecture?
How does Laravel’s event system work?
File Handling & Storage
How do you handle file uploads in Laravel?
Logging & Monitoring
How do you implement Laravel logging?
Testing & Debugging
How do you test a Laravel application?
Laravel Lifecycle & Internal Mechanisms
How does Laravel’s request lifecycle work?
What is the role of the Kernel in Laravel’s architecture?
What is the difference between service providers and facades in Laravel’s architecture?
What is the role of Facades in Laravel, and how do they work internally?
What is the purpose of the boot() method in service providers?
Extending Laravel
What are Laravel macros?
Core Concepts & Lifecycle
Explain Laravel’s request lifecycle from the moment a request enters to the response.
What is the role of `public/index.php` in Laravel?
How does Laravel handle exceptions and errors?
How does Laravel implement dependency injection?
What is the purpose of the Kernel in Laravel?
How do Laravel’s `bind()` and `singleton()` methods work in the service container?
How does Laravel’s autoloading mechanism work?
Caching & Performance Optimization
What are the different types of caching available in Laravel?
How does Laravel’s cache tagging work?
How do you cache database queries in Laravel?
How do you optimize Laravel applications for performance?
What are some strategies to handle a large number of database queries efficiently?
How do you configure and use Redis caching in Laravel?
How does Laravel handle caching in its architecture?
Testing in Laravel
What is PHPUnit, and how does Laravel use it for testing?
How do you write a feature test in Laravel?
How do you mock dependencies in Laravel tests?
What is Laravel Dusk, and how does it work?
How does Laravel handle database testing with in-memory SQLite?
Queues & Jobs
What are Laravel queues, and how do they work?
How do you implement job retries in Laravel?
What is Laravel Horizon, and how does it improve queue management?
How do you manage failed jobs in Laravel?
How do you prioritize queues in Laravel?
API Development in Laravel
What is the difference between `resource()` and `apiResource()` in Laravel routing?
How does Laravel handle API versioning?
How do you format API responses in Laravel?
What is Laravel’s `Resource` class, and how do you use it?
How do you implement rate limiting in Laravel APIs?
Ecosystem & Deployment
What is Laravel Forge, and how does it help in deployment?
What is Laravel Vapor, and how does it enable serverless Laravel?
What are the different ways to deploy a Laravel application?
How do you configure environment variables for different deployment environments?
How do you set up Laravel with Docker for local development?
What is the difference between `php artisan serve` and running Laravel on a local web server?
Performance & Scaling
What is Laravel Octane and how does it improve performance?
How do you scale a Laravel application?
How does Laravel handle database connection pooling?
How do you optimize database queries in Laravel for large-scale applications?
What are the best practices for writing Laravel applications in a large-scale production environment?
How does Laravel handle database caching?
What is the impact of using database queues on performance in Laravel?
How does Laravel handle database connection pooling and scalability?
How does Laravel support microservices architecture?
Multi-Tenancy & Multi-Database Support
How do you implement multi-tenancy in Laravel?
How does Laravel handle multi-database connections?
How does Laravel handle multi-tenancy in its architecture?
How does Laravel support multi-tenancy in database handling?
How do you implement database sharding in Laravel?
Queue & Job Management
How do you implement a custom queue driver in Laravel?
How do you use API resources in Laravel?
How do you implement database sharding in Laravel?
What is the purpose of jobs and queues in Laravel’s architecture?
Elasticsearch & Third-Party Integrations
How do you integrate Laravel with Elasticsearch?
Miscellaneous Advanced Topics
What are Laravel macros, and how do you use them?
How do you implement a multi-tenant architecture in Laravel?
What is Laravel Octane, and how does it impact performance?
How do you implement a custom Artisan command?
What is Laravel Scout, and how does it handle full-text search?
What is Laravel Livewire, and when should you use it?
How does Laravel handle WebSockets and real-time updates?
How does Laravel’s task scheduling feature work in its architecture?
How does Laravel integrate with third-party services while maintaining architectural best practices?
How does Laravel handle internationalization and localization in its architecture?
How do you integrate Laravel with NoSQL databases like MongoDB?