Summary
| Data Structure Name | Queue |
| Type | Linear Data Structure |
| Tagline | FIFO – First In First Out |
| Operations | Enqueue Dequeue |
| Use cases |
Definition
Queue follows the FIFO – First In First Out principle, so the item which is inserted at first, will go out first. Elements are added to the back of the queue and pulled out from the front of the queue.

![]() NOTE
NOTE
Use Cases
Queue data structures are created for maintaining a queue of tasks or processes, so that we can we can maintain the sequence of the items and process those one by one. First-in-First-out is used for processing a queue.
We can implement a Queue in Javascript using the Linked List data structure, or by simply using an array. However, using the array implementation is not recommended as it can cause performance issues for long queues.
Let’s check the implementation processes of a Queue in JavaScript-
Implementation #1: Queue using Linked List
A Singly Linked List case be used to implement a Queue. We need to consider the following-
- We consider the head of the list as the “Front” of the queue.
- We consider the tail of the list as the “Rear” of the Queue.
- To enqueue an item we add/push it to the end of the queue.
- To dequeue we just need to shift items from the front.

Step #1: Node(Queue item) Class
We need a node class to store the queue items. This stores data, and info of the next node.

class Node {
  constructor(data) {
    this.data = data;
    this.next = null;
  }
}class Node<T> {
data: T;
next: Node<T> | null;
constructor(data: T) {
this.data = data;
this.next = null;
}
}![]() NOTE
NOTE
For TypeScript we are using a generic and passing the type as <T>. This “T” type will be the type of data.
Step #2: Queue Class
Queue class is responsible for storing information about the front, rear, and handling operations.
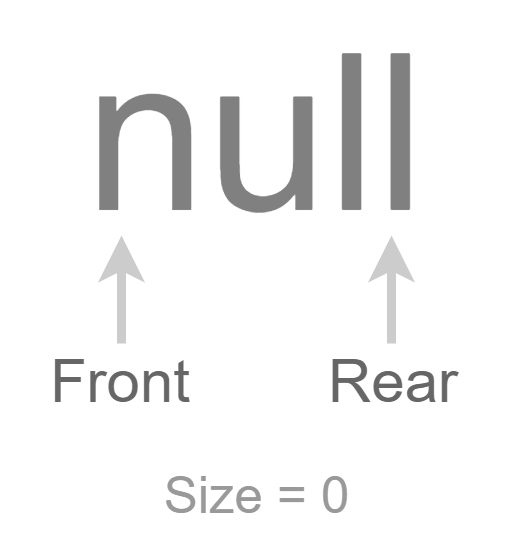
class Queue {
constructor() {
this.front = null;
this.rear = null;
this.size = 0;
}
// ...
}class Queue<T> {
public front: Node<T> | null;
public rear: Node<T> | null;
public size: number;
constructor() {
// Initialize head, tail, and length
this.front = null;
this.rear = null;
this.size = 0;
}
}![]() NOTE
NOTE
For TypeScript we are using a generic and passing the type as <T>. We need to pass this type <T> to the “Node” item.
Step #3: Enqueue
To enqueue we need to add the item at the end/rear of the queue.
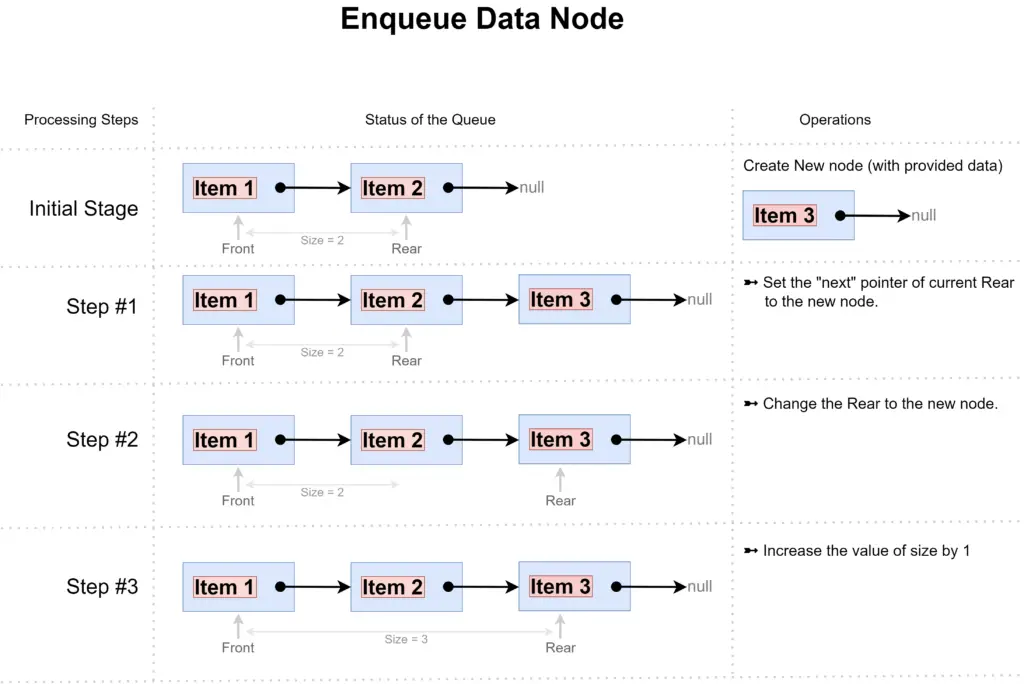
class Queue {
// ...
enqueue(data) {
const newNode = new Node(data);
if (this.size === 0) {
this.front = newNode;
this.rear = this.front;
} else {
this.rear.next = newNode;
this.rear = newNode;
}
this.size++;
return this.size;
}
// ...
}class Queue<T> {
// ...
enqueue(data: T): number {
const newNode = new Node(data);
if (this.size === 0) {
this.front = newNode;
this.rear = this.front;
} else {
this.rear!.next = newNode;
this.rear = newNode;
}
this.size++;
return this.size;
}
// ...
}Step #4: Dequeue
To dequeue, we will shift nodes from the front of the list-
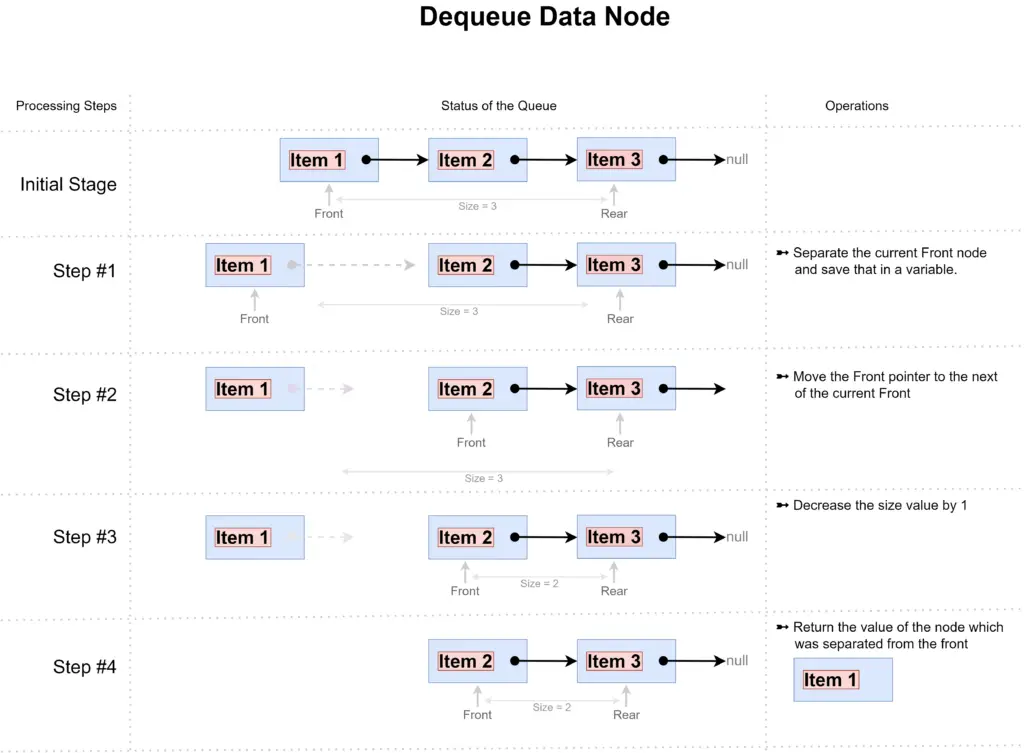
class Queue {
// ...
dequeue() {
if (!this.front) {
return null; // Or return your expected empty value
}
const existingFront = this.front;
this.front = this.front.next;
this.size--;
return existingFront.data;
}
// ...
}class Queue<T> {
// ...
dequeue(): T | null {
if (!this.front) {
return null; // Or return your expected empty value
}
const existingFront = this.front;
this.front = this.front.next;
this.size--;
return existingFront.data;
}
}Full Implementation Code
Here is the full implementation, with all the functionality.
// queue.js
// Implementation of Queue
class Node {
constructor(data) {
this.data = data;
this.next = null;
}
}
class Queue {
constructor() {
this.front = null;
this.rear = null;
this.size = 0;
}
enqueue(data) {
const newNode = new Node(data);
if (this.size === 0) {
this.front = newNode;
this.rear = this.front;
} else {
this.rear.next = newNode;
this.rear = newNode;
}
this.size++;
return this.size;
}
dequeue() {
if (!this.front) {
return null; // Or return your expected empty value
}
const existingFront = this.front;
this.front = this.front.next;
this.size--;
return existingFront.data;
}
}
export default Queue;
// queue.ts
// Implementation of Queue
class Node<T> {
  data: T;
  next: Node<T> | null;

  constructor(data: T) {
    this.data = data;
    this.next = null;
  }
}
class Queue<T> {
public front: Node<T> | null;
public rear: Node<T> | null;
public size: number;
constructor() {
// Initialize head, tail, and length
this.front = null;
this.rear = null;
this.size = 0;
}
enqueue(data: T): number {
const newNode = new Node(data);
if (this.size === 0) {
this.front = newNode;
this.rear = this.front;
} else {
this.rear!.next = newNode;
this.rear = newNode;
}
this.size++;
return this.size;
}
dequeue(): T | null {
if (!this.front) {
return null; // Or return your expected empty value
}
const existingFront = this.front;
this.front = this.front.next;
this.size--;
return existingFront.data;
}
}
export default Queue;
Demo
Here is the demo code for using the implemented functionality of Queue-
// demo.js
import Queue from "./queue.js";

// Create a new Queye
let bigboxQueue = new Queue();

console.log("\n\n----------- Queue - Enqueue example -----------\n");

// Enqueue items
console.log('Enqueue - "Big" | Result: size = ', bigboxQueue.enqueue("Big"));
console.log('Enqueue - "Box" | Result: size = ', bigboxQueue.enqueue("Box"));
console.log('Enqueue - "Code" | Result: size = ', bigboxQueue.enqueue("Code"));


console.log("\n\n----------- Queue - Dequeue example -----------\n");

// Dequeue items
console.log("Dequeue | Result: ", bigboxQueue.dequeue());
console.log("Dequeue | Result: ", bigboxQueue.dequeue());
console.log("Dequeue | Result: ", bigboxQueue.dequeue());
console.log("Dequeue | Result: ", bigboxQueue.dequeue());// demo.ts
import Queue from "./queue";
// Create a new Queye
let bigboxQueue = new Queue<string>();
console.log("\n\n----------- Queue - Enqueue example -----------\n");
// Enqueue items
console.log('Enqueue - "Big" | Result: size = ', bigboxQueue.enqueue("Big"));
console.log('Enqueue - "Box" | Result: size = ', bigboxQueue.enqueue("Box"));
console.log('Enqueue - "Code" | Result: size = ', bigboxQueue.enqueue("Code"));
console.log("\n\n----------- Queue - Dequeue example -----------\n");
// Dequeue items
console.log("Dequeue | Result: ", bigboxQueue.dequeue());
console.log("Dequeue | Result: ", bigboxQueue.dequeue());
console.log("Dequeue | Result: ", bigboxQueue.dequeue());
console.log("Dequeue | Result: ", bigboxQueue.dequeue());
Output:
Output of the demo code will look like below-
----------- Queue - Enqueue example -----------
Enqueue - "Big" | Result: size =  1
Enqueue - "Box" | Result: size =  2
Enqueue - "Code" | Result: size =  3
----------- Queue - Dequeue example -----------
Dequeue | Result:  Big
Dequeue | Result:  Box
Dequeue | Result:  Code
Dequeue | Result: nullTests
Let’s test the functionality using automated testing. Use the following code for testing.
// queue.test.js
import { describe, it, beforeEach, expect } from "vitest";
import Queue from "./queue";

describe("Queue using Linked List", () => {
  describe("Enqueue item", () => {
    let queue;

    beforeEach(() => {
      queue = new Queue();
    });

    it("Should enque items correctly", () => {
      let length = queue.enqueue("Big");

      expect(length).toBe(1);

      length = queue.enqueue("Box");

      expect(length).toBe(2);

      length = queue.enqueue("Code");

      expect(length).toBe(3);
    });
  });

  describe("Dequeue item", () => {
    let queue;

    beforeEach(() => {
      queue = new Queue();

      // Enqueue some items first
      queue.enqueue("Big");
      queue.enqueue("Box");
      queue.enqueue("Code");
    });

    it("Should dequeue item correctly", () => {
      let item = queue.dequeue();

      expect(item).toBe("Big");

      item = queue.dequeue();

      expect(item).toBe("Box");

      item = queue.dequeue();

      expect(item).toBe("Code");

      item = queue.dequeue();

      expect(item).toBeNull();
    });
  });
});
// queue.test.ts
import { describe, it, beforeEach, expect } from "vitest";
import Queue from "./queue";

describe("Queue using Linked List", () => {
  describe("Enqueue item", () => {
    let queue: Queue<string>;

    beforeEach(() => {
      queue = new Queue<string>();
    });

    it("Should enque items correctly", () => {
      let length = queue.enqueue("Big");

      expect(length).toBe(1);

      length = queue.enqueue("Box");

      expect(length).toBe(2);

      length = queue.enqueue("Code");

      expect(length).toBe(3);
    });
  });

  describe("Dequeue item", () => {
    let queue: Queue<string>;

    beforeEach(() => {
      queue = new Queue<string>();

      // Enqueue some items first
      queue.enqueue("Big");
      queue.enqueue("Box");
      queue.enqueue("Code");
    });

    it("Should dequeue item correctly", () => {
      let item = queue.dequeue();

      expect(item).toBe("Big");

      item = queue.dequeue();

      expect(item).toBe("Box");

      item = queue.dequeue();

      expect(item).toBe("Code");

      item = queue.dequeue();

      expect(item).toBeNull();
    });
  });
});
Time Complexity
The time complexity of operation on a Queue implementation using a linked list is as below-
| Operation | Complexity |
|---|---|
| Enqueue | O(1) |
| Dequeue | O(1) |
Implementation #2: Queue using Array (not recommended)
![]() NOTE
NOTE
This implementation is not recommended for large size of queues. As it will cause performance issues for a large queue.
This is shown here, so that you know that there is an easy implementation of Queue, using array. Use it for a small Queue, or for test purposes.
We can store the full queue information in an array. Just declare it an array, and use that as a queue-
- Enqueue items by pushing/adding items at the end.
- Dequeue by shifting array element from the starting of the array.
Enqueue
Let’s enqueue items to the declared array-
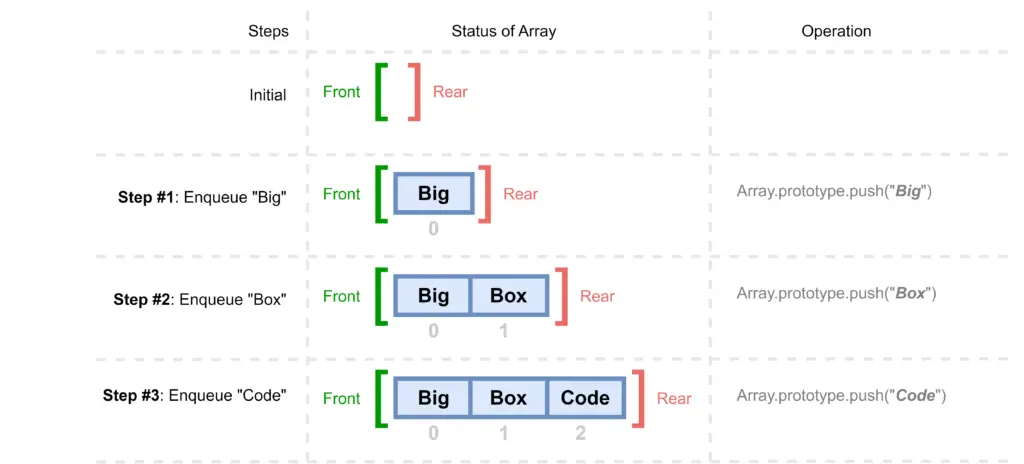
- Declare an array. We have declared “queueItems” variable and initialized it as with an empty array.
- We can use the push() method of the array – Array.prototype.push(), to add an item at the end of the array.
let queueItems = [];
// Let's enqueue some items at the end of the array
// We can use Array.prototype.push() function for that
queueItems.push("Big");
queueItems.push("Box");
queueItems.push("Code");Dequeue
To dequeue we can just shift items from the start of the array-
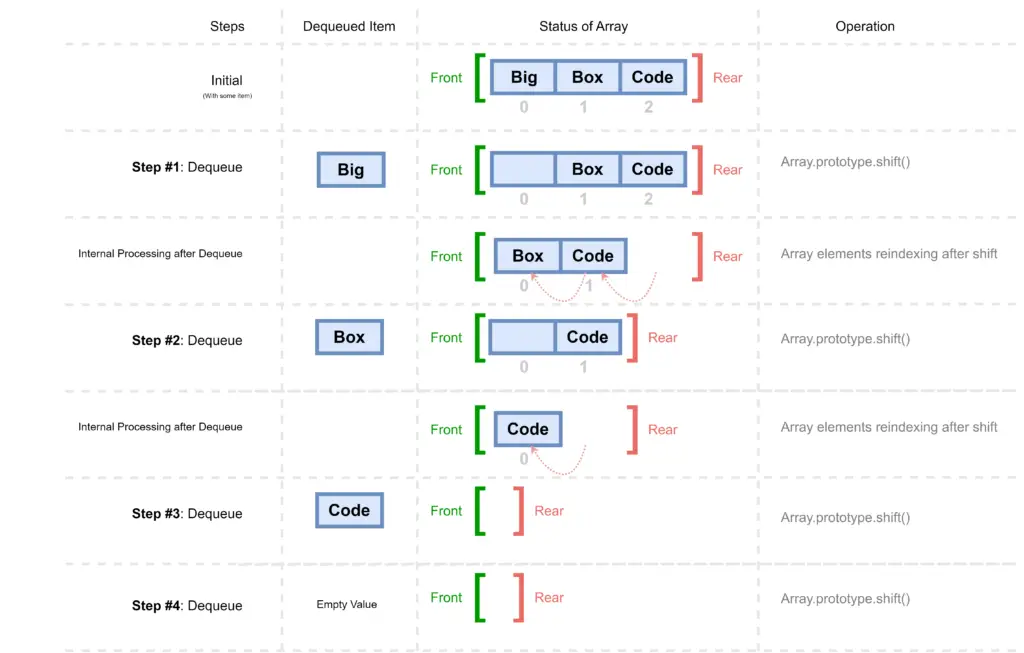
- Use the shift() method to shift items from the front- Array.prototype.shift().
- This returns the item from the start of the array, and removes it from the array.
// Let's dequeue item one by one
// We can use Array.prototype.shift() for that
let popItem = queueItems.shift();

console.log("popItem: ", popItem);

popItem = queueItems.shift();

console.log("popItem: ", popItem);

popItem = queueItems.shift();

console.log("popItem: ", popItem);

popItem = queueItems.shift();

console.log("popItem: ", popItem);Output:
popItem:  Big

popItem:  Box

popItem:  Code

popItem: undefinedWrap it in a Class
We can wrap it in class, and expose only the required functionality. This way, no one will exploit the array directly.
class Queue {
    construct() {
        this.queueItems = [];
    }
    enqueue(data) {
        queueItems.push(data);
        return queueItems.length;
    }
    dequeue() {
        return queueItems.shift();
    }
}Let’s check the implementation.
const bigboxQueue = new Queue();

// Let's enqueue some items
bigboxQueue.enqueue("Big");
bigboxQueue.enqueue("Box");
bigboxQueue.enqueue("Code");

// Let's dequeue item one by one
let dequeueItem = bigboxQueue.dequeue();
console.log("dequeueItem: ", dequeueItem);

dequeueItem = bigboxQueue.dequeue();
console.log("dequeueItem: ", dequeueItem);

dequeueItem = bigboxQueue.dequeue();
console.log("dequeueItem: ", dequeueItem);

dequeueItem = bigboxQueue.dequeue();
console.log("dequeueItem: ", dequeueItem);Output:
dequeueItem:  Big

dequeueItem:  Box

dequeueItem:  Code

dequeueItem: undefinedProblem with this approach
Problem with this approach is in the dequeue process-
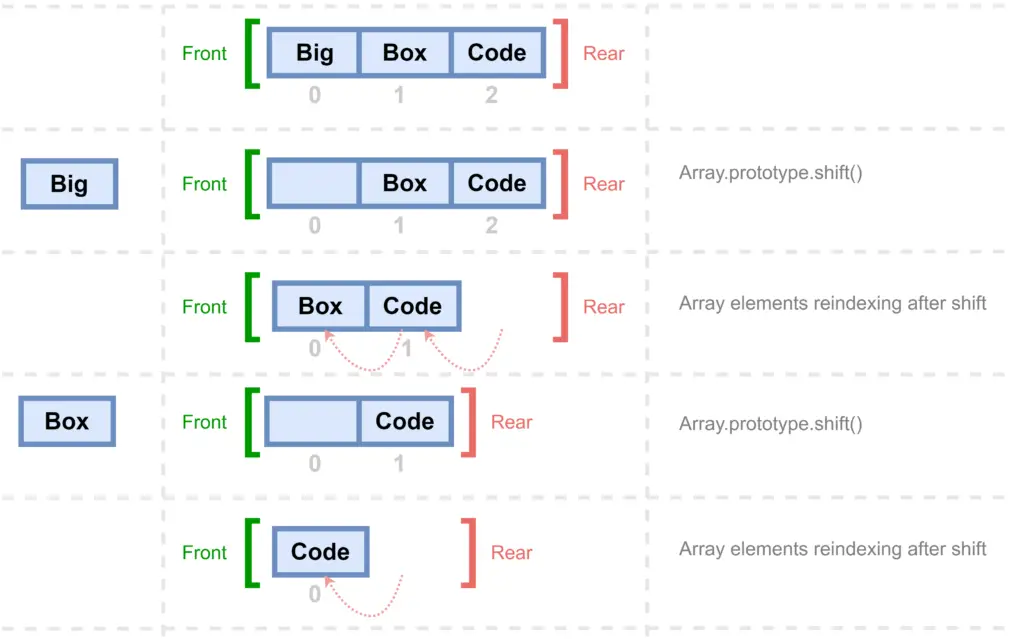
Every time we shift an item from the start of the array, the rest of the items need to be reindexed. The bigger the array, the more time it takes to reindex.
This increases the time complexity of this approach. That is why this approach is not recommended for large queues.
Source Code
Use the following links to get the source code used in this article-
| Source Code of | Implementation Code | Demo Code | Test Code |
|---|---|---|---|
| JavaScript Implementation | |||
| TypeScript Implementation |
Related Data Structures
| Command | Details |
|---|---|
| Singly Linked List |
