
Server-Sent Events(SSE) are used to implement real-time communication, where the server sends data to the client.
In this article, we have discussed all the details of the SSE implementation. All the headers and options are covered in this article.
Though frontend implementations are covered in this article, but for more details on frontend and EvenSource you can refer to the Web (JS EventSource) Client details article.
Features
SSE has the following features:
- A persistent connection, where the client connects to the server, and the server keeps the connection alive (until there is an issue).
- Uses a regular HTTP connection.
- Uni-directional connection from the server to the client. So the client can only receive data from the server, and the client can not send any data once the connection is established.
- Can receive UTF-8 text only.
- Uses fewer resources than WebSockets (as a connection to TCP/IP socket is not required in this case).
- Automatic reconnection/retry is performed from the client side, in case there is an issue on the server (like server restart).
- Available in Web Workers.
- Very simple implementation process.
Limitations
Limitations on connecting from one browser at a time:
- HTTP/1.1: Max 6-8 connections at a time.
- HTTP/2: Max 100 connections by default (can be changed from server configuration).
This limit is for connecting to a single server(domain) from a browser at a time. So if you are using HTTP/2 on the server and your domain is bigboxcode.com, then you can create a total of 100 connections to bigboxcode.com at a time from a single browser (including all tabs).
Other limitations:
- Can send only UTF-8 text. So you can only send text data that consists of UTF-8 characters, as the content type is text/event-stream.
- No support for client-to-server data sending. Once the connection is established, the client can not send data after that, using the same connection.
Request and Response
Here is a diagram to represent what a Server-Sent Event(SSE) request and response look like:

SSE Server (using NodeJS)
Let’s create the simplest NodeJS server possible to demonstrate Server-Sent Events(SSE).
Create a new file named index.js and add the following content in that:
const http = require('http');

const reqListener = function (req, res) {
  let counter = 0;

  res.writeHead(200, {
    'Content-Type': 'text/event-stream',
    'Connection': 'keep-alive',
    'Cache-Control': 'no-cache',
    'Access-Control-Allow-Origin': '*'
  });

  setInterval(function() {
    res.write(`data: ${counter} message from bigboxcode.com\n\n`);
    counter++;
  }, 3000);

}

const server = http.createServer(reqListener);
server.listen(3000);
Make sure you have NodeJS installed. Navigate to the directory in the terminal and type the following command:
node index.jsOpen your browser and access http://localhost:3000. You will see something like the below:
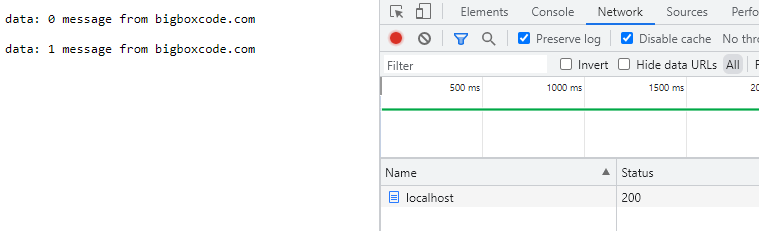
And after every 3 seconds (as the timeout in the code is 3 sec) you will see a new line appearing.
This example is just to demonstrate the use of the required headers. In an ideal case, you will not be accessing the SSE endpoint directly from the browser, but it will be accessed using EventSource (which we will describe in the later sections).
So what is happening here? Let’s take a look.
- We are creating a basic NodeJS server. This is given as we can not perform HTTP requests and responses without it.
- In the HTTP response, we are writing 3 headers at first. These are the main thing that enables the SSE capability.
- ‘Content-Type’: ‘text/event-stream’ : this tells the client that it is an event stream (of type text).
- ‘Connection’: ‘keep-alive’: this tells the client to keep the connection alive.
- ‘Cache-Control’: ‘no-cache’: this tells the client to revalidate the cache before using (mainly to revalidate data before using).
- We are not ending the connection at any point. So res.end() is not used anywhere. Always res.write() is used so that the server only writes and this writing goes continuously.
- We are writing some new data after an interval (3 seconds) and the new content keeps being added to the page.
Note: The main magic in the backend is happening because of the headers that is being sent in response, especially for ‘Content-Type’: ‘text/event-stream’ and all other headers are supporting that.
Note: In the data part data: ${counter} message from bigboxcode.com\n\n there is a space required after “data:” and 2 newline(\n\n) characters required at the end.
Note: As SSE supports only text data, so if you want to send JSON then just stringify the data and send it like res.write(`data: ${JSON.stringify(data)}\n\n`) and then parse that to JSON back on the frontend when you receive it.
Note: the ‘Access-Control-Allow-Origin’: ‘*’ header is added to handle the cross-origin issue, do not use it if not needed in your case. This header is not related to SSE.
Note: SSE endpoint needs to serve a GET request. Any other method like POST, PUT, etc. cannot be used.
SSE Client
Create a file named index.html (choose any name you like) and add the following code to the file:
<html>
  <head>
    <title>SSE List Demo</title>
  </head>

  <body>
    <ul id="response-list">
      <!-- new content appears here -->
    </ul>
  </body>

  <script>
    const eventSource = new EventSource('http://localhost:3000');

    eventSource.onmessage = function (currentEvent) {
      const listElement = document.getElementById('response-list');
      const newElement = document.createElement('li');
      newElement.innerText = currentEvent.data;

      listElement.appendChild(newElement);
    };
  </script>
</html>
Now what is happening here:
- We have a list in the HTML, where we want to show the new content.
- We are subscribing to http://localhost:3000(our SSE endpoint) by creating a new EventSource object.
- Subscribing to the EventSource object function onmessage, so whenever a new message is received by the EventSource the data will be received(and processed) in this function.
Open the HTML file in the browser directly, you will see something like the below:
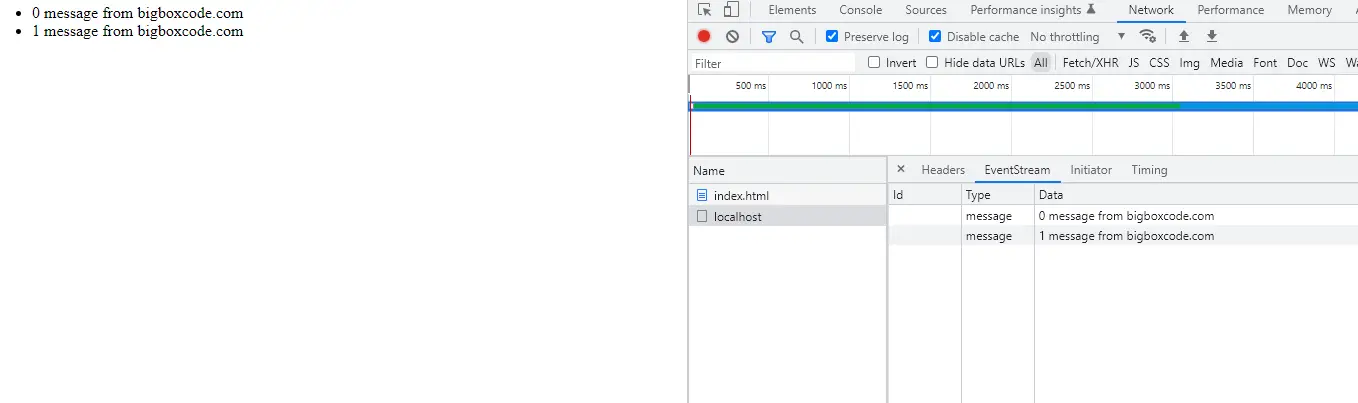
New data will be added (every 3 seconds) to the list and you can also see the data being received in the developer tool’s Network > EventStream section.
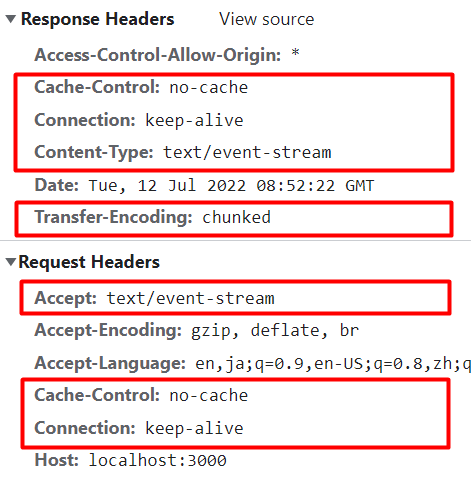
Here are the request and response headers when the connection was established from the browser to the server.
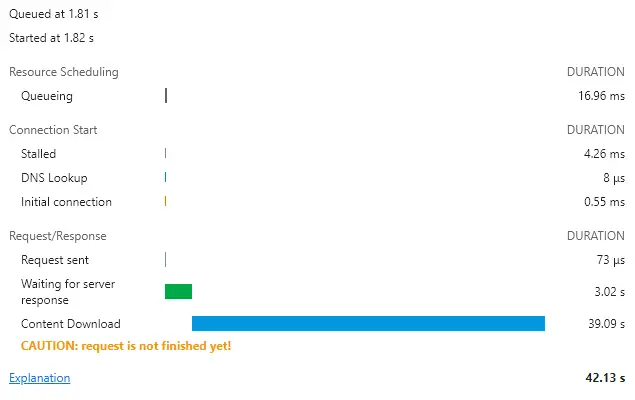
Here are the timing details of a request to the SSE endpoint when sent from the server. See the “Content Download” part at the end, that is where data was being sent from the server and received by the browser.
Check SSE Endpoint Using cURL
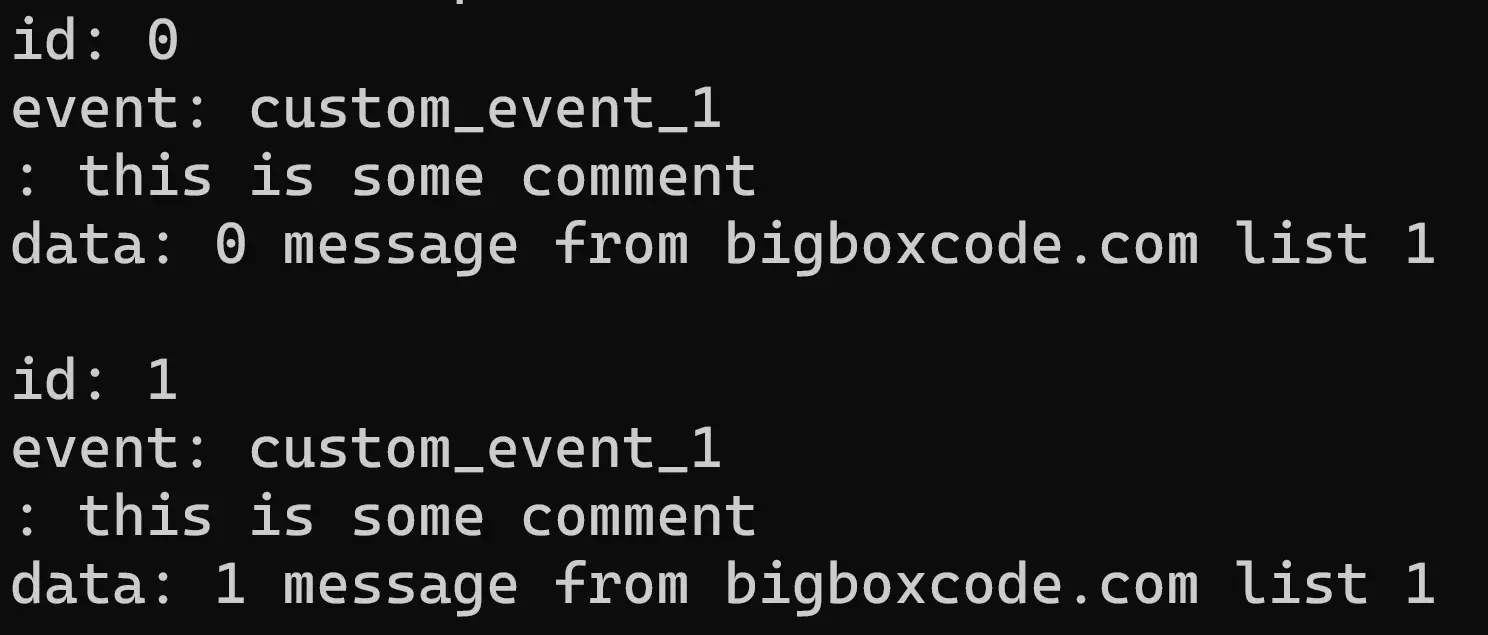
If you want to check the SSE endpoint using curl, use the command below:
curl -N http://localhost:3000You will see the messages in the terminal, like below:
id: 0
event: custom_event_1
data: 0 message from bigboxcode.com list 1

id: 1
event: custom_event_1
data: 1 message from bigboxcode.com list 1

id: 2
event: custom_event_1
data: 2 message from bigboxcode.com list 1
Notice that the prefix (id, event, data) appears in the result.
The -N (–no-buffer) option for cURL, stops any buffering, so that the result is shown immediately.
To make it even better you can send the “Accept:text/event-stream” as a header, using -H argument:
curl -N -H "Accept:text/event-stream" http://localhost:3000Check SSE Endpoint Using Postman
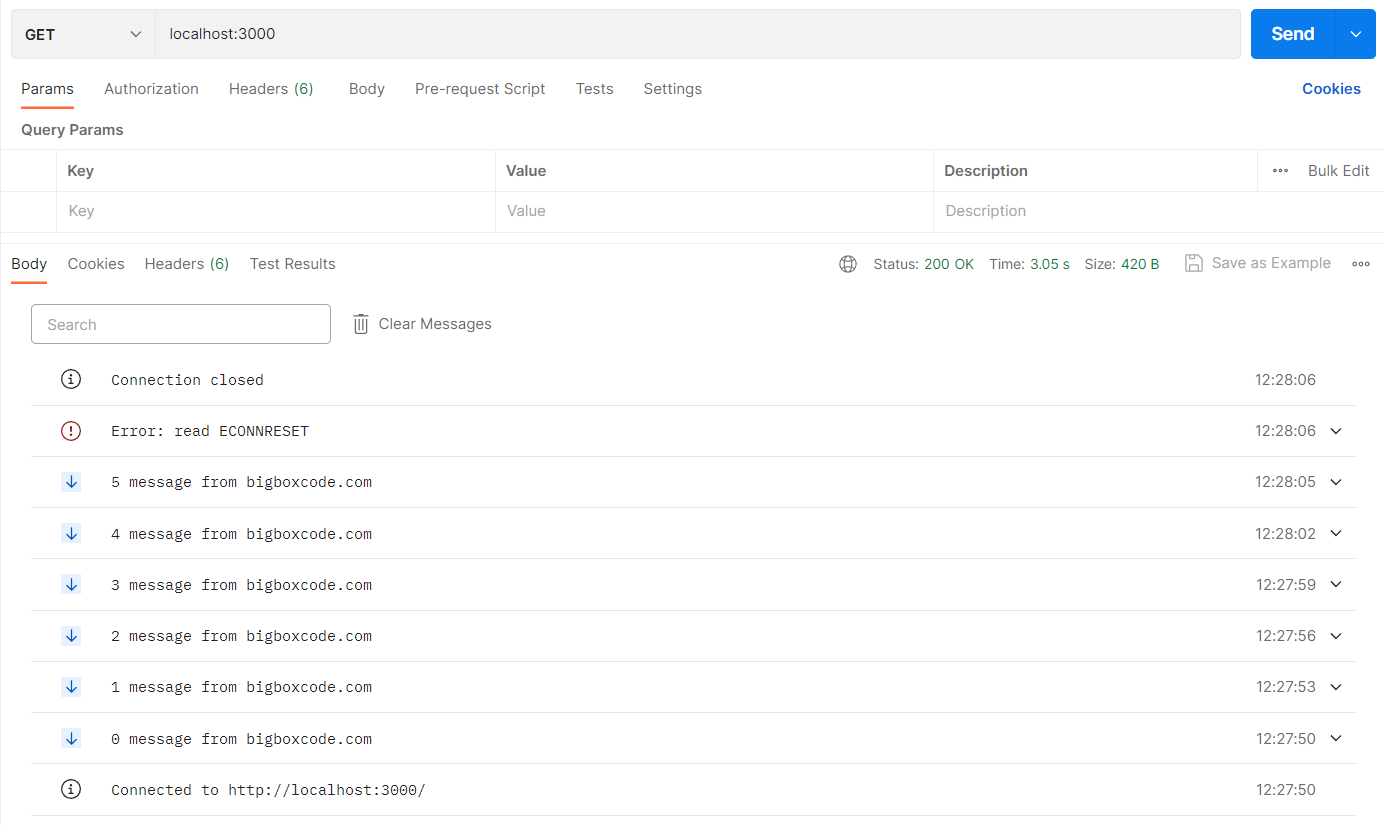
We can connect to the SSE endpoint and receive the data using Postman. Use the following configuration-
- Request Type(Method): GET
- URL: http://localhost:3000 (as our local server is running on that host:port)
Then send the request, and you will see the response received by Postman. On connection close, Postman will show the “Connection Closed” message..
Send Multiline Data
If you want to send data in multiline then that is possible too. This can be done like below:
const http = require('http');

const reqListener = function (req, res) {
  res.writeHead(200, {
    'Content-Type': 'text/event-stream',
    'Connection': 'keep-alive',
    'Cache-Control': 'no-cache',
    'Access-Control-Allow-Origin': '*'
  });

  setInterval(function() {
    res.write(`data: {\n`);
    res.write(`data: "name": "BigBoxCode"\n`);
    res.write(`data: "url": "https://bigboxcode.com"\n`);
    res.write(`data: "category": "SSE"\n`);
    res.write(`data: }\n\n`);
    counter++;
  }, 3000);

}

const server = http.createServer(reqListener);
server.listen(3000);
End each line of data with a newline character(\n) and add 2 newline characters(\n\n) when the data part is complete.
Send JSON Data
if you want to send JSON data then just stringify the data on the backend using JSON.stringify(data), as only UTF-8 text can be sent.
const data = {
  name: "BigBoxCode",
  url: "https://bigboxcode.com",
  category: "SSE",
};

res.write(`data: ${JSON.stringify(data)}\n\n`);
Then when you receive the data on the front end, just parse the JSON data using JSON.parse(someJsonDataString).
events.onmessage = (event) => {
  const data = JSON.parse(event.data);

  console.log(data);
};
Additional Data (id, event type, retry interval)
In addition to the ‘data‘, 3 more additional elements can be sent from the server.
- id: this defines the id of the current message, and is defined on the server. This id is used to determine which was the last sent message in case of reconnections.
- type (event): this defines the custom type or event name (just as a string identifier) for a message. By default, the type of received data will be ‘message‘.
- retry: this defines the retry interval between disconnect and next retry. This needs to be an integer value and represents the number of milliseconds between retry.
Let’s see how we can send the id, type, and retry. Update your NodeJS server file index.js with the following code:
const http = require('http');

const reqListener = function (req, res) {
  let counter = 0;

  res.writeHead(200, {
    'Content-Type': 'text/event-stream',
    'Connection': 'keep-alive',
    'Cache-Control': 'no-cache',
    'Access-Control-Allow-Origin': '*'
  });

  setInterval(function () {
    res.write(`id: ${counter}\n`);
    res.write(`event: custom_event_1\n`);
    res.write(`retry: 20000\n`); // for retry interval of 20 sec
    res.write(`data: ${counter} message from bigboxcode.com list\n\n`);
    counter++;
  }, 3000);

}

const server = http.createServer(reqListener);
server.listen(3000);Note: Newline character required at the end of id, even and retry data.
Note: retry is not generally used, as the retry value is defined in the EventSource implementation of the browser. But if in any case, you realize that using a different retry duration will help your application, then you can use it.
Note: the retry value can be sent with or without data. And you need to send it only once, when you want to change the retry duration. No need to send it in each response.
Handling Custom Event
In the previous section, we learned about sending event types from the backend. In this section, we will see how to handle that on the front end. Add the code from the following section in index.js file.
const http = require('http');

const reqListener = function (req, res) {
  let listCounter1 = 0;
  let listCounter2 = 0;
  let listCounter3 = 0;

  res.writeHead(200, {
    'Content-Type': 'text/event-stream',
    'Connection': 'keep-alive',
    'Cache-Control': 'no-cache',
    'Access-Control-Allow-Origin': '*'
  });

  setInterval(function () {
    res.write(`id: ${listCounter1}\n`);
    res.write(`event: custom_event_1\n`);
    res.write(`data: ${listCounter1} message from bigboxcode.com list 1\n\n`);
    listCounter1++;
  }, 3000);

  setInterval(function () {
    res.write(`id: ${listCounter2}\n`);
    res.write(`event: custom_event_2\n`);
    res.write(`data: ${listCounter2} message from bigboxcode.com list 2\n\n`);
    listCounter2++;
  }, 10000);

  setInterval(function () {
    res.write(`id: ${listCounter3}\n`);
    res.write(`event: custom_event_3\n`);
    res.write(`data: ${listCounter3} message from bigboxcode.com list 3\n\n`);
    listCounter3++;
  }, 20000);

}

const server = http.createServer(reqListener);
server.listen(3000);
What is happening here?
- An SSE connection is created.
- 3 functions are sending data at 3 different intervals.
- Each function has different event name (custom_event_1, custom_event_2, cusotm_event_3) and each function has separate id counter.
To receive these events with a custom name we need to use addEventListener instead of onmessage. Update your HTML file with the following content.
<html>
  <head>
    <title>SSE List Demo</title>
  </head>

  <body>
    <ul id="response-list">
      <!-- new content appears here -->
    </ul>
  </body>

  <script>
    const eventSource   = new EventSource('http://localhost:3000');
    const listElement = document.getElementById('response-list');

    eventSource.addEventListener("custom_event_1", function(currentEvent) {
      const newElement = document.createElement('li');
      newElement.innerText = `event: custom_event_1 | id: ${currentEvent.lastEventId} | type: ${currentEvent.type} | data: ${currentEvent.data}`;

      listElement.appendChild(newElement);
    });

    eventSource.addEventListener("custom_event_2", function(currentEvent) {
      const newElement = document.createElement('li');
      newElement.innerText = `event: custom_event_2 | id: ${currentEvent.lastEventId} | type: ${currentEvent.type} | data: ${currentEvent.data}`;

      listElement.appendChild(newElement);
    });

    eventSource.addEventListener("custom_event_3", function(currentEvent) {
      const newElement = document.createElement('li');
      newElement.innerText = `event: custom_event_3 | id: ${currentEvent.lastEventId} | type: ${currentEvent.type} | data: ${currentEvent.data}`;

      listElement.appendChild(newElement);
    });
  </script>
</html>Note: the id sent from the server is received as lastEventId on the frontend.
Open the HTML file in the browser, you will see something like the below:
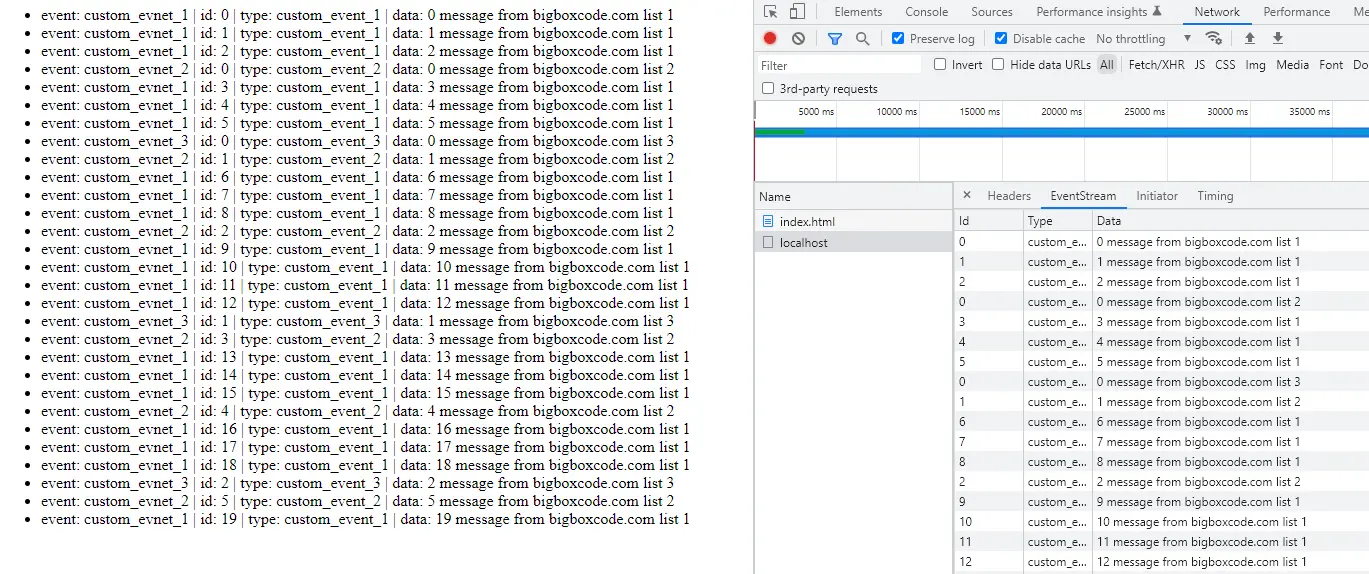
Here all 3 custom events are being received and managed in 3 different functions.
Sending Comment
You can send a comment using the format:
: your comment here\n
So it starts with a colon (“:”), then space, and then your comment text, and finally, it ends with a newline (\n).
Note: Comment sent from a server will not trigger any event on the front end.
Note: you can see the comments by using cURL command `curl -N -H "Accept:text/event-stream" http://localhost:3000`, check details in the section: Check SSE Using cURL
Reason for including the comment: In some specific cases, like when used with a proxy, the proxy servers sometimes drop the connection if the connection is inactive for long. In that case, this comment can be sent after a certain interval (say, every 15-20 seconds) so that the connection is not dropped.
Connection Close Detection on Server
To check on the server if the connection is closed you can use the following lines of code:
req.on('close', () => {
  console.log(`Connection closed`);
});
For more detailed implementation you can check the implementation on ExpressJS: NodeJS SSE Implementation. This includes maintaining a subscriber list and sending data to the subscriber using another API endpoint.