
This article will explain, how to implement Server-Sent Events(SSE) in PHP.
More details about SSE including all headers and options are discussed in a separate article, check that to know the subject in detail (Server-Sent Events (SSE)).
JS web client and EventSource options and complete usage are discussed in a separate article in detail (JS EventSource SSE Web Client).
Let’s discuss PHP SSE implementation step-by-step.
Step #1: Simplest PHP SSE Implementation
Let’s create the simplest SSE server in PHP. Create a PHP file named index.php and add the following code.
<?php
// index.php

header('Content-Type: text/event-stream');
header('Connection: keep-alive');
header('Cache-Control: no-store');

header('Access-Control-Allow-Origin: *');

$messageCounter = 1;

while (true) {
  // Output blank data to make the connection abort detection work
  echo "data: \n\n";

  // or you can send comment instead
  //echo ": your comment here\n";

  ob_flush();
  flush();

  if (connection_aborted()) break;

  echo 'data: ' . $messageCounter++ . '. Message from bigboxcode, at - ' . date('Y-m-d H:i:s');
  echo "\n\n";

  ob_flush();
  flush();

  sleep(3);
}
What is happening here?
- The most important thing is to set the header. So we are setting 3 main headers here.
- Content-Type: text/event-stream
- Connection: keep-alive
- Cache-Control: no-store
- In a while loop, we are putting a 3 seconds delay. So messages will be relayed after every 3 seconds.
- For the real data that needs to be sent, we have “data: Some message here”.
- At the end of the message data, there are 2 newline characters (\n\n). This is a required criterion of SSE data.
- After each message write there is code to flush the data, so that the script does not wait for the execution to end and sends the message immediately.
Make sure your PHP script is running on some web server.
Or, if you don’t have a web server installed (or don’t want to run it through the web server) then run the PHP built-in server using the following command:
php -S localhost:8000For the frontend, create an HTML file named index.html (or any name you prefer). Add the following code to the file.
<html>
<head>
<title>PHP SSE Demo</title>
</head>
<body>
<ul id="list">
<!-- new content appears here -->
</ul>
</body>
<script>
const eventSource = new EventSource('http://localhost:8000');
const listElement = document.getElementById('list');
eventSource.onmessage = function (currentEvent) {
if (currentEvent.data.length > 0) {
const listElement = document.getElementById('list');
const newElement = document.createElement('li');
newElement.innerText = currentEvent.data;
listElement.appendChild(newElement)
}
};
</script>
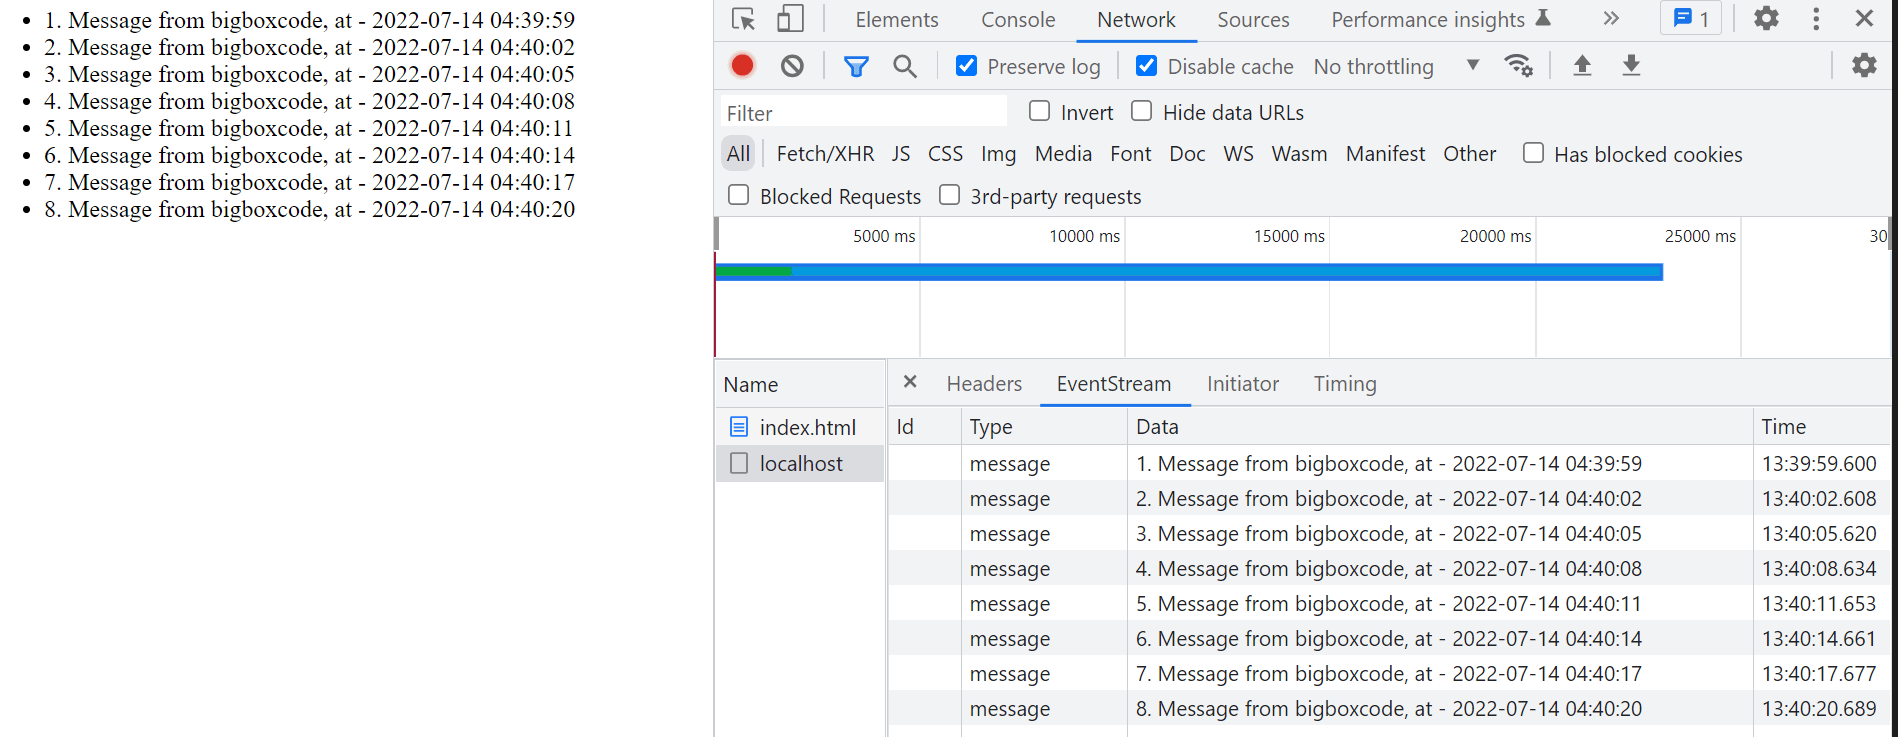
</html>Open the HTML file in the browser directly, you will see output like below. Check the network response also.
Step #2: Fetch Real Data
In the previous step, we sent some static(pre-defined) message that was generated by the script. But in real life, it will not be the case. Your real data will come from some other sources. Like, you will notify users about some data changes in the database, some status changes in 3rd party API, or maybe some file changes.
So you need to read that data inside the while loop (from any source, database, files, or some external API), and then send that message to the client who is subscribing to your SSE source.
For example, here is how to read data from the Redis database and send it to the client.
Run Redis docker container to use Redis (it is not required if you already have Redis running):
docker run --name php-sse-redis -p 6379:6379 -d redisThis will run a docker container named php-sse-redis and expose it to port 6379.
To use Redis we will use a client library named predis. For that initialize a composer.json file using composer init command, or use the composer composer.json file from below:
{
    "name": "bigboxcode/php-sse",
    "require": {
        "predis/predis": "^2.0"
    }
}
If you are using this composer.json then install the required package using:
composer installIf you have created your own composer.json then install predis package using:
composer require predis/predisNow we can use the Redis using predis. Change your PHP file like the below:
<?php

// index.php
require 'vendor/autoload.php';

$redisClient = new Predis\Client([
    'scheme' => 'tcp',
    'host'   => 'localhost',
    'port'   => 6379,
]);

header('Content-Type: text/event-stream');
header('Connection: keep-alive');
header('Cache-Control: no-store');

header('Access-Control-Allow-Origin: *');

$prevPrice = 0;

while (true) {
  // Output blank data to make the connection abort detection work
  echo "data: \n\n";

  // or you can send comment instead
  //echo ": your comment here\n";

  ob_flush();
  flush();

  if (connection_aborted()) break;

  // Read data from redis (or datbase, file, or external API here)
  // Say, current currency price being written in your redis instance
  // key name is 'current_price' (SET current_price 99)

  $currentPrice = $redisClient->get('current_price');

  // if there is a price change then send
  if ($currentPrice != $prevPrice) {
    echo 'data: ' . $currentPrice ."\n\n";

    ob_flush();
    flush();

    $prevPrice = $currentPrice;
  }

  sleep(3);
}
This way whenever the ‘current_price’ value is changed in the Redis database, your script will pull that change and send it to the SSE client.
To test the functionality, run the PHP file and open the HTML in the browser.
Then to change data in Redis, get inside docker and change the value. Use commands like the below:
# This following line will take you to shell inside redis container and you will access access Redis CLI
docker exec -it php-sse-redis redis-cli

# After getting into the Redis CLI use SET command to set value of current_price
127.0.0.1:6379> SET current_price 101.45
OK

# Change the value again
127.0.0.1:6379> SET current_price 176.99
OK
You should see the changes on the front end.
Step #3: Use Pub/Sub
Instead of querying the database after every few seconds, you can use the Publish and Subscribe method. This way whenever there is a change a publish event will be triggered and your subscribing script will be notified instantly (no need to query after a few seconds).
We are using Redis Pub/Sub for that. Here is the data flow:
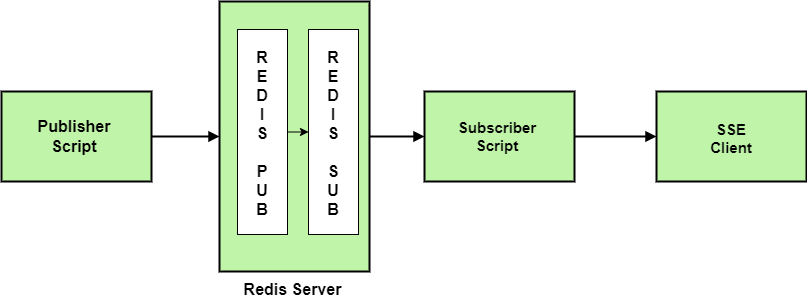
![]() Make sure Redis server is running.
Make sure Redis server is running.
If it is not running(the server that we started using docker), then start it using the following command.
docker start php-sse-redis Make sure to run the publisher and subscriber as 2 separate applications, either in different hosts and/or ports.
Subscriber
To use Redis Pub/Sub change your index.php file like below. This is our subscriber. We are subscribing to a channel named ‘message_update’.
<?php
// index.php

require 'vendor/autoload.php';

$redisClient = new Predis\Client([
    'scheme' => 'tcp',
    'host' => 'localhost',
    'port' => 6379,
]);

header('Content-Type: text/event-stream');
header('Connection: keep-alive');
header('Cache-Control: no-store');

header('Access-Control-Allow-Origin: *');

$pubsub = $redisClient->pubSubLoop();
$pubsub->subscribe('message_update');

foreach ($pubsub as $message) {
    // Switch can be used here, if you prefer
    // in place of match
    $data = match ($message->kind) {
        'subscribe' => "Subscribed to {$message->channel}\n",
        'message' => date('Y-m-d H:i:s') . ": " . $message->payload,
    };

    echo "data: " . $data . "\n\n";

    ob_flush();
    flush();
}

// Unsubscribe
$pubsub->unsubscribe('message_update');


// Required in some cases
// This helps to cleanup and preven protocol deserialization
unset($pubsub);

// Disconnect redis
$redisClient->disconnect();
Run this index.php script on port 8000, using:
php -S localhost:8000 index.phpPublisher
To test Pub/Sub created another file to publish the message to channel ‘message_update. Create a PHP file named ‘publish.php’, and add the code below:
<?php
// publish.php
require 'vendor/autoload.php';

$redisClient = new Predis\Client([
    'scheme' => 'tcp',
    'host'   => 'localhost',
    'port'   => 6379
]);

// Accept message
$message = $_POST['message'] ?? null;
$success = false;

if ($message) {
    try {
        // Publish to 'message_update' channle whenever there is a new message
        $redisClient->publish('message_update', $message);
        $success = true;
    } catch (\Exception $e) {
        $message = $e->getMessage();
    }
}

header("Content-Type: application/json");
echo json_encode(['success' => $success, 'message' => $message]);
exit();
Run this publish.php script on a separate port (we are running it on port 8888), using:
php -S localhost:8888 publish.phpFrontend
Change your HTML file with the following code. Change the subscription URL if needed.
<html>
<head>
<title>PHP SSE Demo</title>
</head>
<body>
<h2>Messages</h2>
<ul id="message-list">
<!-- new messages appears here -->
</ul>
</body>
<script>
const eventSource = new EventSource('http://localhost:8000/index.php');
const listElement = document.getElementById('message-list');
eventSource.onmessage = function (currentEvent) {
const newElement = document.createElement('li');
newElement.innerText = currentEvent.data;
listElement.appendChild(newElement)
};
</script>
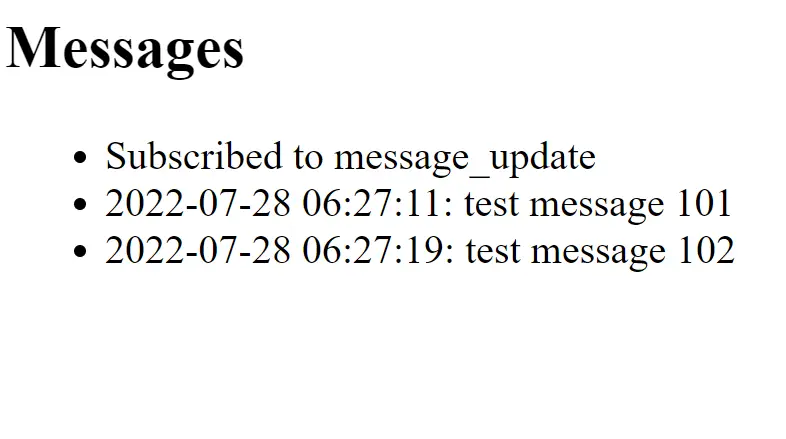
</html>Open the HTML file in the web browser directly.
Usage
Now from Postman or any other HTTP client send a POST request to URL http://localhost:8888/publish.php with the ‘message‘ in the request body.
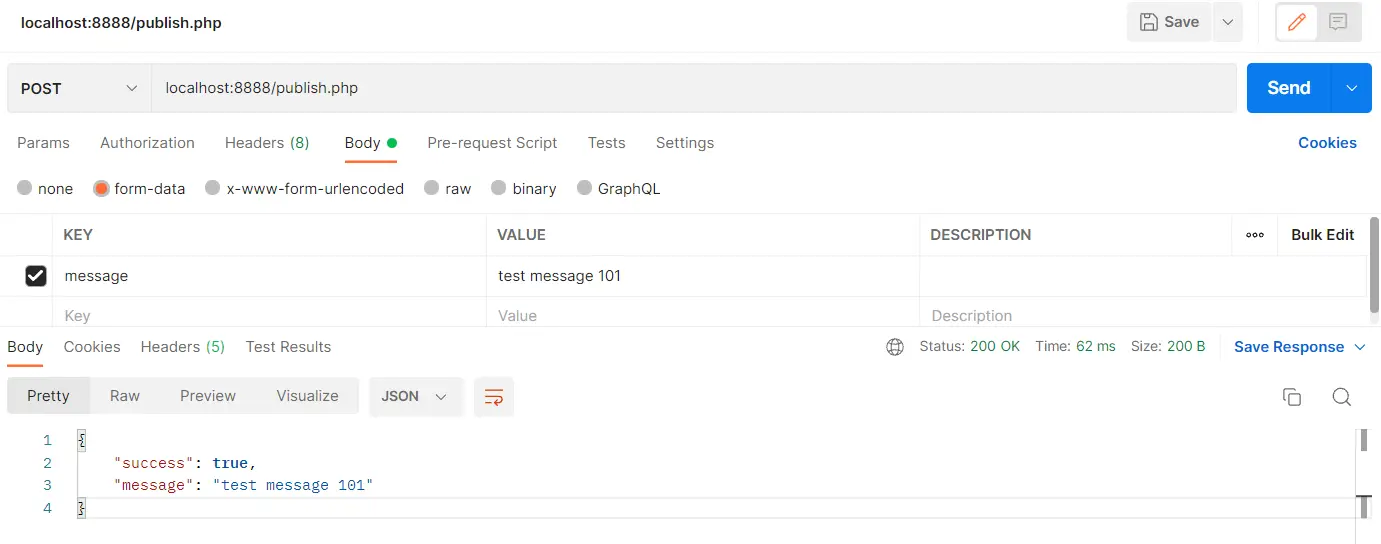
You will see the send messages in the browser.
Source Code
Access the source code for PHP SSE with Redis Pub/Sub using the link below:
| Implementation | Source Code Link |
|---|---|
| SSE with PHP Pub/Sub |
Not work. Endpoint freezes
Thanks for pointing this out. I have updated the code to solve the issue.
Some output needs to be sent for the connection abort to work.
I added the following lines of code in the “while” loop, to make it work. This will send blank data in a certain interval.
echo "data: \n\n";ob_flush();
flush();
Instead of blank data, comment can also be sent in the “while” loop.
echo ":comment here \n";ob_flush();
flush();
This will detect the connection close, when the client is closed.
pub/sub not modified
pub/sub does not need the change as it is not detecting the connection close in the code.
If the connection is closed, then predis will handle that. It will take some time though.
on pub\sub example I see that the code inside is being executed (via the log) – line 32 at Subscriber. but the endpoint does not give anything and falls to 504
The code seems to work fine.
you should get the output
This is bad code because of this line right here: set_time_limit(0); — JavaScript, server-side events has built in error handling. Part of this error handling includes reconnecting to the server if an SSE event handle is closed (either purposely or unexpectedly). There’s no need to spawn infinitely running processes every time the PHP file is ran. This will also cause Cloudflare to give a 523 error after 100 seconds unless you implement a heartbeat type of thing at an interval of under 100 seconds. Additionally, depending on your Redis settings, you might want to add in ‘read_write_timeout’ => 0 to ensure that doesn’t disconnect.
Agreed. the set_time_limit(0) is not required. as the client will reconnect automatically, if disconnected. And the set_time_limit(0) would leave the script running infinitely. Removed the time limit code.
Also the unset of $pubsub doesn’t make sense. you need to unsubscribe $pubsub and stop it.
unset($pubsub) helps in some cases to clean up.
I have added code for unsubscribing the channel, and Redis client closing.