Summary
| Pattern Name | Bridge Pattern |
| Pattern Type | Structural Pattern |
| Other Names | Handle/Body |
| Scope | Object |
| Tagline | Decouple abstraction from implementation to enable independent working |
| Use cases | When we want the abstraction and implementation to work separately/independently |
| Related Patterns | Abstract Factory Adapter |
| Difficulty Level | Medium |
| Implementations |   |
Definition
Say, we are printing some UI Elements for an application (for Desktop / Web / Mobile).
We have UI element base class and actual element classes like Button, Input field, Table, Text, TextArea, etc. Whenever we need to print an element we use these element classes.
On the other hand, we have classes for setting colors, like Red, Green, Blue, etc.
While printing the element we want to select any element dynamically as required and at the same time we want to set the color dynamically. So that each element and color can be set and changed dynamically.

To handle this case, we can use the Bridge pattern. Using Bridge we can decouple the implementation of UI Element and Color Schema, so the elements and colors will have a separate hierarchy. That way the implementation of the Elements and Color will be independent and the element color can be set dynamically.
 Birdge pattern decouples an abstraction from its implementation, so that those can be changed independently.
Use Cases
Here are a few use cases of bridge pattern.
- When we want to eliminate strong binding between abstraction and implementation.
- When we want the implementation to be switched at runtime.
- When we want to combine and/or extend different attractions and implementations independently.
- When we want the change in the implementation, not to impact the client.
- When we want to hide the implementation from the client.
Implementation
To understand the implementation we have to first understand 4 terms, which are the primary elements of Bridge pattern implementation.
- Implementor: Interface that represents some criteria of the actual abstraction.
- Concrete Implementor: Implementation class of the implementor interface.
- Abstraction: Abstract class that represents the object we want to use in the client.
- Refined Abstraction: Implementation classes of the Abstraction.
Check the following diagram for the use-cases of these 4 elements.
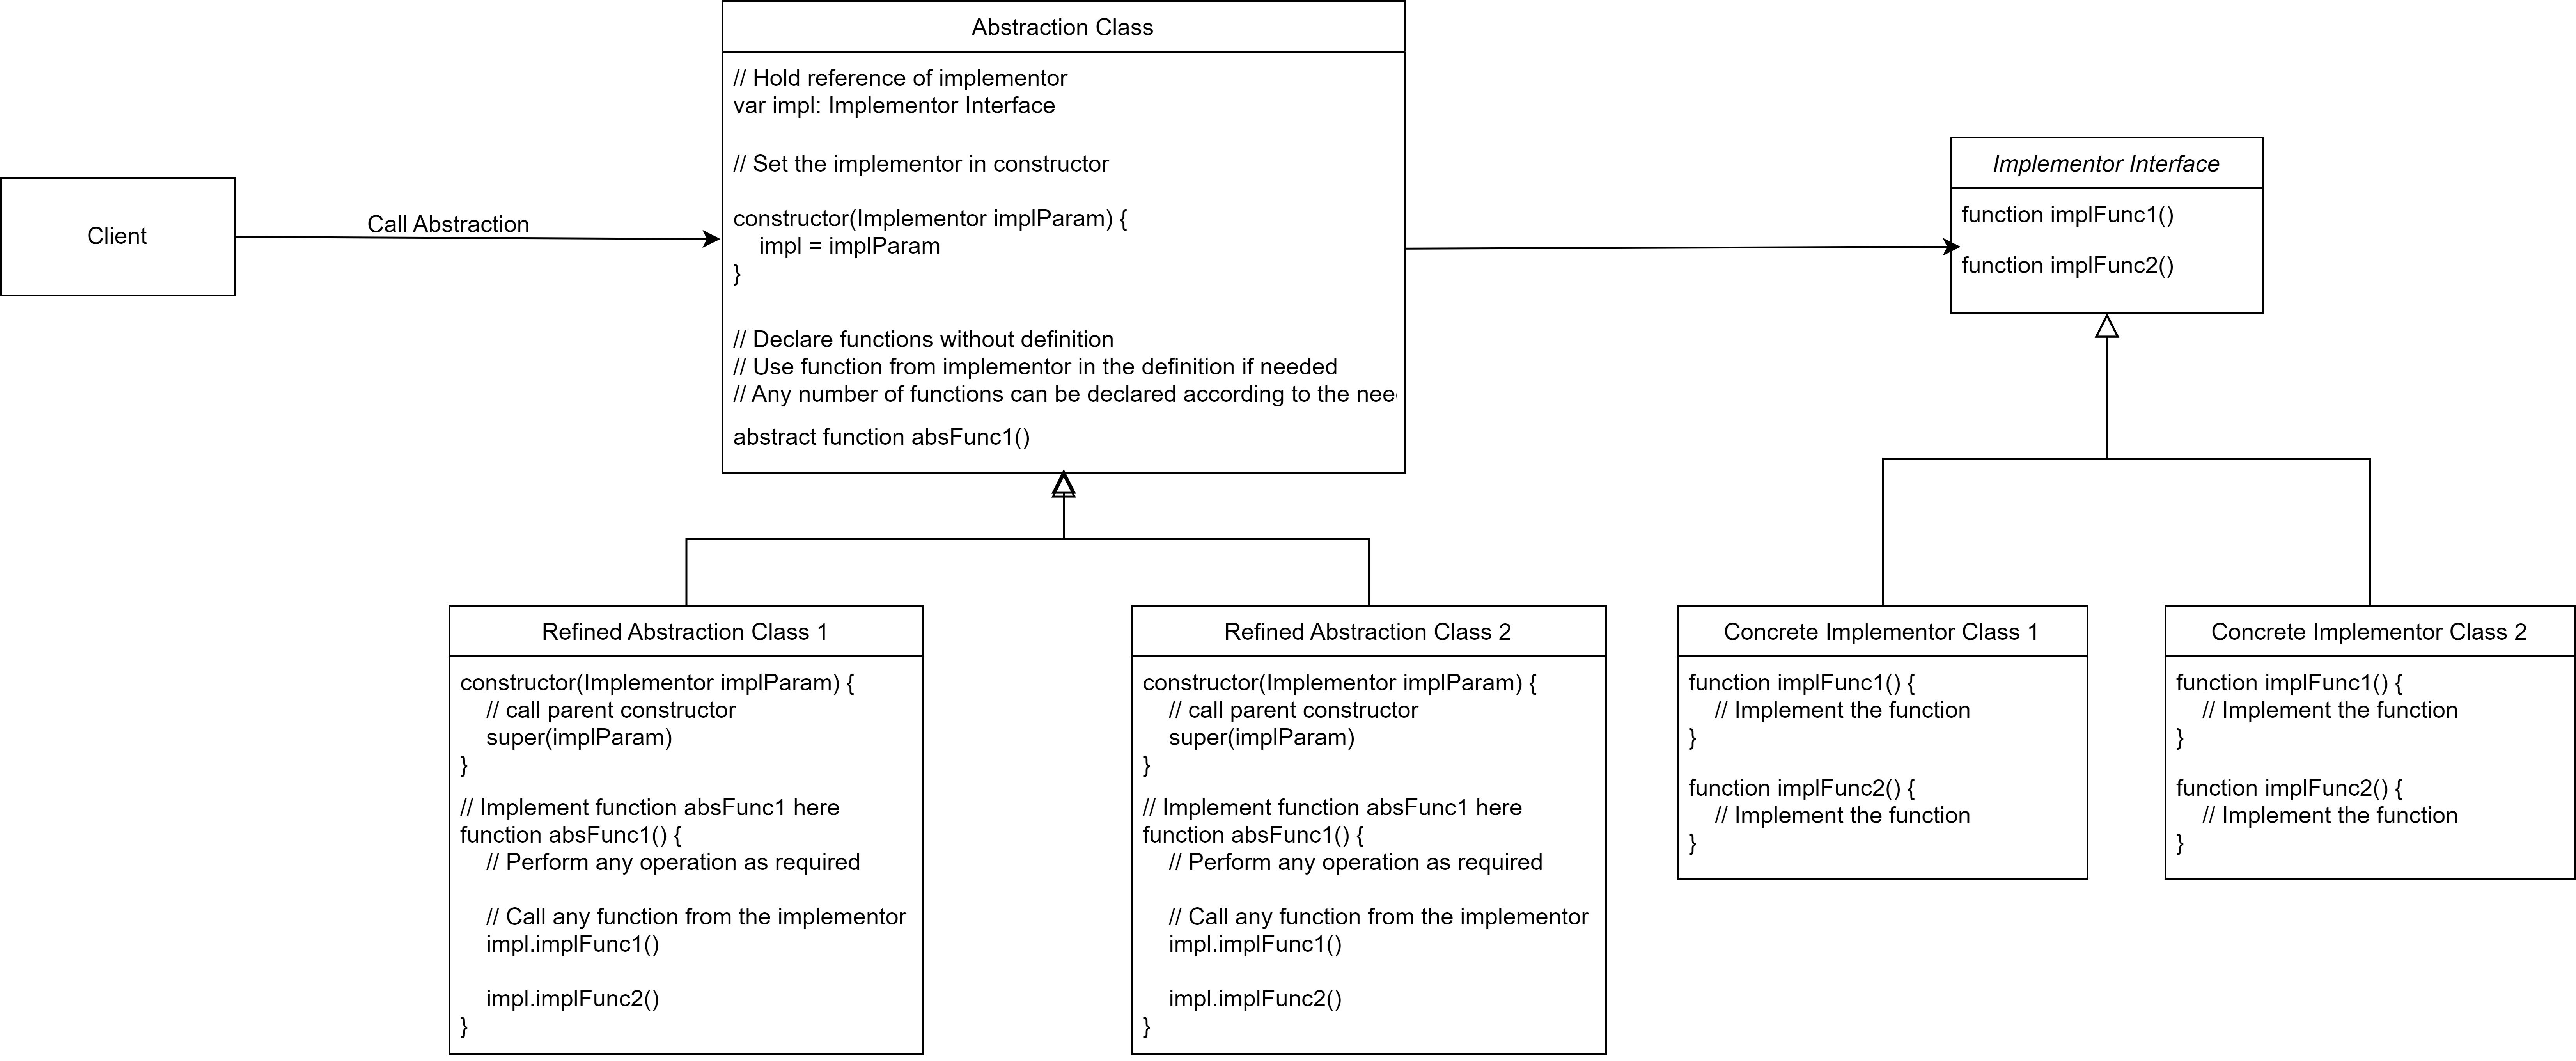
Follow the steps below to implement Bridge pattern.
- Create an interface for representing the implementor.
- Create one or more classes (as required) and implement the implementor interface for these classes. These classes will represent some criteria of the actual object that we want to use.
- Create an Abstract class to represent the actual objects that we want to use.
- Store a reference of the implementor class in the abstraction, so that the implementor can be used in different places of abstraction. Pass the implementor object in the constructor and save the reference.
- Create classes and extend the Abstract class. Use functions from the implementor in these classes.
- From the client create an object of the Abstraction class, and pass an object of the implementor classes to the abstraction.
This way the Implementor and the Abstraction will be completely separate.
Examples
Let’s take a look at some examples that demonstrate Bridge pattern implementation.
Example #1: UI Element Color
interface ColorSchema

    void setColor()

end interface

class Red implements ColorSchema

    function setColor()
        print "Setting proper color for Red color schema"
    end function

end class

class Green implements ColorSchema

    function setColor()
        print "Setting proper color for Green color schema"
    end function

end class

class Blue implements ColorSchema

    function setColor()
        print "Setting proper color for Blue color schema"
    end function

end class
abstract class UIElement
var colorSchema: ColorSchema
constructor(ColorSchema colorSchemaParam)
colorSchema = colorSchemaParam
end constructor
abstract function printElement()
end class
class Button extends UIElement
constructor(ColorSchema colorSchemaParam)
// Call parent constructor
super(colorSchemaParam)
end constructor
function printElement()
// Write code for printing element
print "Printing Button"
// Set color schema
colorSchema.setColor()
end function
end class
class Input extends UIElement
constructor(ColorSchema colorSchemaParam)
// Call parent constructor
super(colorSchemaParam)
end constructor
function printElement()
// Write code for printing element
print "Printing Input"
// Set color schema
colorSchema.setColor()
end function
end class
class Table extends UIElement
constructor(ColorSchema colorSchemaParam)
// Call parent constructor
super(colorSchemaParam)
end constructor
function printElement()
// Write code for printing table element
print "Printing Table"
// Set color schema
colorSchema.setColor()
end function
end class
Demo
// Print a Red table
table: UIElement = new Table(new Red())
table.printElement()

// Print a Green Input box
input: UIElement = new Input(new Green())
input.printElement()

// Print a Blue Button
button: UIElement = new Button(new Blue())
button.printElement()

// Print a Red Button
button2: UIElement = new Button(new Red())
button2.printElement()
Output
Printing Table
Setting proper color for Red color schema

------------------------------

Printing Input
Setting proper color for Green color schema

------------------------------

Printing Button
Setting proper color for Blue color schema

------------------------------

Printing Button
Setting proper color for Red color schema
Example #2: Transport Seat Reservation
interface Seat

    void selectSeat()

end interface


class BusinessClassSeat implements Seat

    function selectSeat()
        print "Select an Business class seat"
    end function

end class

class EconomyClassSeat implements Seat

    function selectSeat()
        print "Select an Economy class seat"
    end function

end class
abstract class Transport

    var seat: Seat

    constructor(Seat seatParam)
       seat = seatParam
    end constructor

   abstract function selectTransport()

end class

class Plane extends Transport

    constructor(Seat seatParam)
        // Call parent constructor
        super(seatParam)
    end constructor

    function selectTransport()
        // Write code to select transport
        print "Plane selected for transport"

        // Select seat
        seat.selectSeat()
    end function

end class

class Train extends Transport

    constructor(Seat seatParam)
        // Call parent constructor
        super(seatParam)
    end constructor

    function selectTransport()
        // Write code to select transport
        print "Train selected for transport"

        // Select seat
        seat.selectSeat()
    end function

end class
Demo
Transport plane = new Plane(new BusinessClassSeat())
plane.selectTransport()

Transport plane2 = new Plane(new EconomyClassSeat())
plane2.selectTransport()

Transport train = new Train(new EconomyClassSeat())
train.selectTransport()
Output
Plane selected for transport
Select an Business class seat

------------------------------

Plane selected for transport
Select an Economy class seat

------------------------------

Train selected for transport
Select an Economy class seat
Code Implementations
Use the following links to check the implementation of the bridge pattern in specific programming languages.